nav bar


Monday, January 31, 2011

studio weekend


This weekend was a nice change of pace. Especially after a big fat failure friday. I didn't even get a post up friday because I was so frustrated. First I tried to re-crochet something that I had just frogged because the pattern I was using made it way too big. After getting back to where I originally was I realized it was still slightly too big. It kills me to pull things apart that I spend so much time on so instead of doing it again, I just put it to the side to handle later.

Then I moved on to my sewing machine. It hasn't been working right since I brought it home from my apartment. I think it got a little shaken up in the move and now the tension is all off. I tried everything I could find online to fix it but to know avail. It was such a craft-fail day that I didn't want to do anything else. I had a nice break from it all though and I think I'm ready to face it all again. I just seriously don't know what to do about my sewing machine. :(

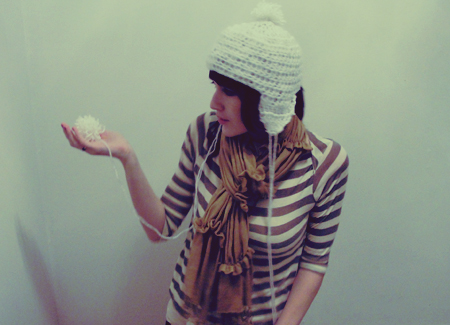
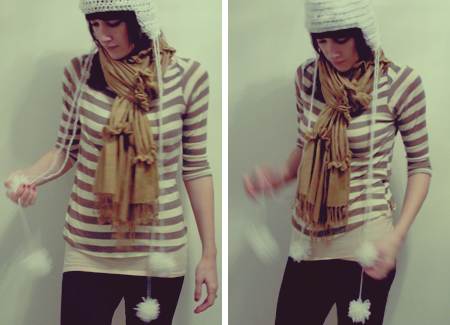
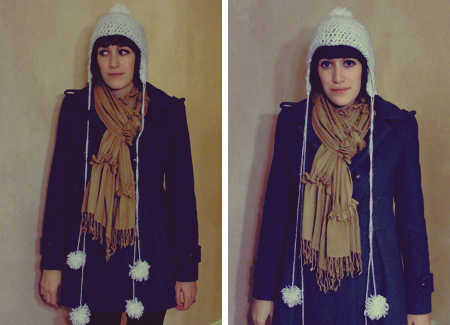
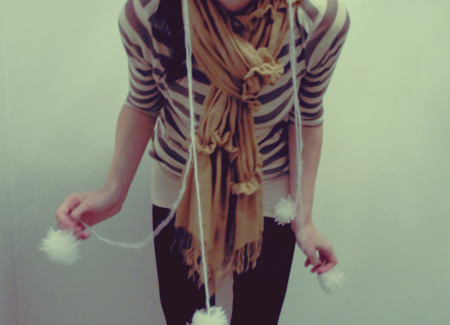
Anyway.. This weekend I helped Charlie get some work done at the studio. After a long day of shooting on saturday, he did a little photo shoot with me because I feel like I have no recent and decent pictures of myself. I change my hair color so much that it's really noticeable when my photos are more than a few months old. I plan to do a post on that someday. I'll show you how I went from a California blonde to dark brown.. making a pit stop at pink and blue on the way there. :)


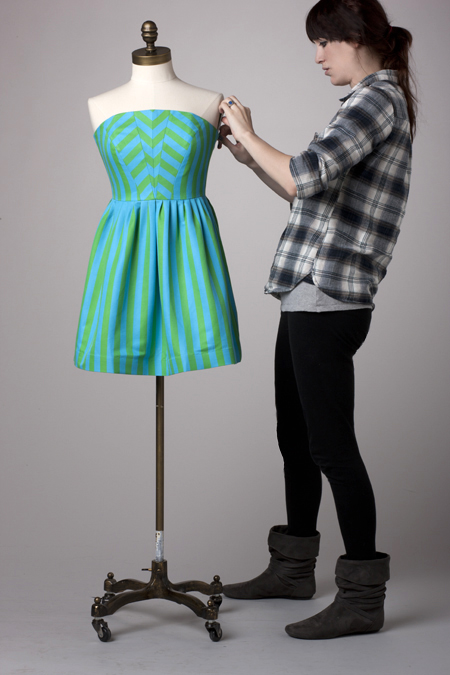
On sunday I got to play stylist and help set up some dresses on forms. Definitely a fun job!


We ended the day with margaritas and pizza. Perfection.

Hope everyone had a great weekend!

Thursday, January 27, 2011

vday dessert inspiration


I wouldn't say I'm a big city kind of girl. I more prefer the small town aesthetic and less crowdedness overall. But after living in the city for four years throughout college, there are a few things I got used to and some I really miss. This one came to mind as I was thinking about what dessert I want to make for Valentine's Day. Last VDay in the city, Charlie made an awesome seafood dinner for us and we had wine and one very special dessert from Naked Chocolate.

If you are ever in Philadelphia, seek this place out. Sit down and relax with some drinking chocolate or a divine pastry. This is one place I truly miss. The first time I had a bite from there was in a design class where we had to photograph nine related objects and then create compositions using them. One girl brought in nine.. pastries.. from.. Naked.. Chocolate. And when she was done shooting them she let the class dig in. I died.


If you know me at all, you know my aversion to sweet things. But there was one pastry I could not stop eating. I couldn't even tell you the name of it but it had this whipped cookies and cream sort of icing, cream, something that just made me die. And then I had a huge stomach ache. But I knew that I needed to have this again. So what better time than Valentine's Day? After classes VDay evening, I popped down the street and picked one up. It was literally around the corner from UArts. Charlie and I split it after dinner and it was pure bliss.

Since I'm not in the city anymore and traveling down there for a pastry seems a little excessive, I wanted to try to recreate this on my own. I have no idea if I can even come close but I've been researching cookies and cream fillings and icings and seeing if anything sounds like it may come close. Then I just need a simple chocolate cake base. I also want to include a flaming strawberry as seen on Sprinkle Bakes because I mean, what is cooler than a dessert with a flame?


So if I am successful in this endeavor I will post the recipe and let you know. But nothing will be as good as the original so I highly recommend you visit the cafe on Walnut Street and indulge yourself for just a few minutes. (Sorry.. couldn't find a photo of the actual dessert :( so above is some other things they serve.)

Happy snow day to those is this general area! ;)

Wednesday, January 26, 2011

branding tenpenny


I've been working like crazy on the branding for tenpenny splendid so I'll be all ready to go when the shop is up and running. Here's just a sneak preview of what's going on in the identity package so far.

You may have already noticed this logo down to the left in my shop ad. For this package I have created a logo, a monogram (above), and an icon (the sparrow in the monogram). I wanted these three different elements so I could do different things with them. The monogram and sparrow icon work well at any scale since they are simple and graphic. The seal can't get too small because of all the information in it.

I'll share all of that soon. I'm just messing around with everything on different pieces such as a business card, thank you note, envelope, hang tag, etc.

I'll also show you all of the inspiration images I used to get my ideas flowing. I had a very specific look in mind and used some visual inspiration for guidance. I'll post the basic design process that went into it.

Above you'll also see my primary color palette. I have a secondary one in the works too that features a few of my favorite colors that pop up around the blog.

I'd love any feedback if you have thoughts or opinions. I'll be revealing the whole thing soon enough. Sometimes I miss art school at times like these. As much as it was kind of horrible, those six hour critiques could be really helpful. Oh no, you didn't read that wrong.. six.. hours.

Yea. Do I really miss that?

Well happy snow day for a good part of the country! Hot chocolate time.

:)

Tuesday, January 25, 2011

a new kind of classroom


I won't lie.. one of my favorite parts about becoming a teacher has always been getting to set up my own classroom. Not the only part obviously, but who wouldn't be excited about getting to customize the place where they spend most of their day? I'm sure people who have their own business could vouch for this.


If I had a bajillion dollars, my little vintage heart would be contented to replace all the desks with these wood and wrought iron beauties from the 1800s. But keeping it a little more realistic, I've been thinking about what I can do to make this space mine. I plan to teach in a public school which makes the whole decorating thing a lot more challenging.

I went to private/catholic schools my whole life so no one took it offensively when Christmas trees and Santa Claus were displayed in every nook and cranny. Since it seems like most seasonal decorating revolves around holidays, I have to get a bit more creative and focus more on seasonal color palettes and changes in nature to perk up the white walls!


All that being said, I've been intensely searching through etsy, looking for the right pieces to complete my ideas for a me kind of classroom. I don't want to lose my style amongst the same multicolored inspirational posters I've seen in every classroom from elementary school through high school. I also don't want to have bare boring walls just because I can't celebrate holidays. I've found some classroom gold so far and I've been collecting images so I can make a few seasonal curations with my finds. You can look for those in the upcoming weeks!

I'm really excited about all the great things I found. Etsy is seriously my new go-to resource for all things awesome. I don't know why I don't think to look there first more often!

Any tips for holiday-free decorating would be greatly appreciated! :)

Monday, January 24, 2011

cookie dough dip


I was hanging out with Charlie and my brother on Friday night and after showing them this recipe, they pretty much insisted I make it immediately. Being a lady who loves the kitchen, I happily obliged since I was super curious about this seemingly magical dip.

The ingredients are pretty basic so I had them all in.

Start by melting butter. Plop your brown sugar in. This recipe is not for the faint of heart ;).


Get the brown sugar all dissolved in the butter.


Combine cream cheese and powdered sugar in a mixer. When the butter/brown sugar mixture has cooled, slowly add it to the cream cheese.


Fold in your chocolate chips either by hand or directly in the mixer. Mine didn't take too kindly to this and started jerking around all dramatic like so I just did it by hand.


That's it! Now you just need something to dip in it. This is where impulsiveness is not always the best thing in the world. We quickly discovered that there were no satisfactory dipping materials in the house. Charlie tried it with a ginger snap. He said there was too much going on between the two flavors. I tried some chips since I'm a huge advocate of the sweet and salty combo. It was pretty good.


We saved it in the fridge so we could get some better dipping items the next day. What I recommend trying is apples and pretzels. Definitely my favorite. This kind of has to do with the taste of the dip itself, which I will explain now. It is a delicious dip, however, in my opinion it does not taste like the chocolate chip cookie dough I know and love. I think the cream cheese comes out too strong in it. Which is why I also think it makes a really good fruit dip!

So my final two-bits on this recipe is this.. if you're looking to eat cookie dough, get out your baking supplies or crack open a roll of toll house. If you want a really different and delicious dip for fruit or graham crackers or whatever else you can think of, then make this. It'd be a really nice addition to the standard dips at a party!

Or, of course, you could just do this ;).


Some exciting new things will be happening with Tenpenny coming this February. One of the goals on my 101 things list is to start sponsoring a few blogs that I like. I've picked three blogs for this month so expect some giveaways and features in the upcoming month! I'm really excited to start branching out more and get my little blog out there.

Happy Monday! My first math class is tonight. Boooo. This is one time art school is coming back to bite me in the ass. We never had to take math or science as undergrads. So now I have to take a basic algebra class as a prereq for my master's. Forget that I took trig/precalc in high school. :P


Chocolate Chip Cookie Dough Dip
recipe from How Sweet it is

1/2 cup butter
1/3 cup brown sugar
8oz cream cheese
1/2 cup powdered sugar
1 tsp vanilla extract
3/4 cup chocolate chips

In a medium saucepan, melt butter. Mix in brown sugar and heat until dissolved. Remove from heat and stir in vanilla. Allow to cool. In a mixer, cream together cream cheese and powdered sugar. Slowly add cooled butter mixture a little at a time. Mix well. Fold in chocolate chips by hand or in mixer. Serve with fruit, pretzels, or cookies that don't have a strong flavor. Enjoy!

Friday, January 21, 2011

below


Since I was looking through old stuff when I stumbled on my fabric print, I decided to share an etching from the undergrad days also.


This was a lot of fun to make. I wasn't sure what I wanted to do for this project so I kind of just made a silly/slightly creepy illustration and went with it. The best part about etchings is that I still have the actual plates they were made from so I could reprint this anytime. It'd help to have a press of course.. one day.


Well that's it. Just a short one this Friday. Showing you a little blast from my (fairly recent) past.

:)

Happy weekend!

Thursday, January 20, 2011

stuffed shells


This is what my hands looked like while I was making dinner last night. So content. Try to ignore the chipped nail polish ;). Charlie came for dinner last night so I decided to make his favorite.. stuffed shells. It's super simple but a little tedious stuffing all those shells. Worth it though because all the cheesy warmth makes it such a good comfort food.

While your shells boil, get your cheese mixture together.


Take a heaping spoonful of the cheese mixture and stuff the shells. This part gets a little messy. I think I might try piping the cheese in sometime. It'll be neater and probably even quicker. Worth a shot!


When they're all lined up in the baking dish, pour your cheese and sauce mixture all over the shells.


Pop it in the oven. Have some wine and bread with pesto while you wait. I told you we like pesto around here. :)

When it comes out of the oven it'll be all bubbly and hot. Scoop out some shells and serve with some crusty bread. (And more pesto.)


So good. Perfect for a cold winter night. We're having "winter weather" warnings here again for tonight. Wonder how much we'll get this time!


Stuffed Shells
recipe adapted from allrecipes

12oz large shell pasta
2 eggs, beaten
32oz ricotta cheese
4 cups shredded mozzarella, divided
1 cup grated parmesan cheese, divided
1 tbsp dry parsley
2 tsp salt
1 tsp black pepper
1 28oz jar pasta sauce

Cook shells for 8 minutes. They should be al dente. Drain and rinse under cold water. Meanwhile, in a medium bowl, combine eggs, ricotta, 2 cups mozzarella, 1/2 cup parmesan, parsley, salt, and pepper. Mix well. Preheat oven to 350F. Fill shells with a heaping spoonful of cheese mixture. Line them up in a greased baking dish. When all the shells are stuffed and lined up, mix pasta sauce with remaining mozzarella and parmesan. Pour over shells, covering them completely. Bake for 45-60 minutes until hot and bubbly.

Enjoy with some crusty bread and a glass of white.


Now I have to go do some reading for class tonight. It's so weird to say that again!

Wednesday, January 19, 2011

airplanes


In thinking about what to make for my shop, I've decided to give an old project a new life. In my fabric printing class as an undergrad, we got an assignment to create a 2 yard print based on any kind of a map. After looking through tons of map images for some inspiration, I decided to make a map of air traffic.


I'm really happy with the way it turned out as it was one of my first prints but now it's just sitting in a drawer with some other projects. I've always wanted to do something with the things I made during school and I think I know what to do with this yardage now.

Since it was my first attempt at a half drop pattern, it's not perfect. There is way more white space surrounding every 10x10in image than I would have liked. I didn't measure correctly and they ended being too far apart, creating large white diagonals between diagonals of the prints. Because of this, I personally don't think if works well as a repeating print so I've been stuck on what to do with it.


I think I finally figured it out though. I want to cut the individual 10x10 prints out and make them into pillows! I figured I could make the planes the front panel and get maybe a blue canvas for the back to match the planes. [You might not be able to see it well in the pictures but they are blue :)] I'll have to see how they look when they're done but I think this could work! It makes me really happy because I hate to see things just sit and not get used when they could possibly serve a purpose.


Maybe I'll look through my old etchings too and see if there's anything good in there!

:)

Tuesday, January 18, 2011

snowball hat


Yesterday I left my bag at Charlie's which has my LIFE in it. I didn't have my computer charger, which allowed me just enough time to get a blog post up before the battery died. I didn't have my cell phone so I borrowed my mom's all day which was so painful. I don't even have a fancy shmance smart phone or anything (yet. hello verizon iphone.) but my phone does have a keyboard. A luxury I've come to take for granted until yesterday. Texting on an old flip phone is 10x more annoying when you're out of practice. This also gives me a little more sympathy towards my mom whose texting skills are subpar.

So what did I do without my everyday technology staples? Well, I got crafty. I did something I've been wanting to do forever. I attempted my first hat. And I think it came out pretty good if I do say so myself! :)


I was so pleased with myself that I wore it all day long. It's not perfect but it was a great learning experience to just do it. For some reason I have inherited tons of white yarn so I used that for the hat in case it was a total disaster. I saved the "good" colors for when I know what I'm doing. This is something I'm considering adding to the shop so I have a pretty good feel for what I want to do with it now.

Things I learned from this..
-how to decrease stitches better so the flaps will have a better shape
-make a tight braid for the danglies so that they are sturdier
-make the longest dangly pompom no longer than hip length so they don't get all wild when you move around but still act as sort of an accessory to the hat


I can't wait to try it again.

I definitely learned something else from yesterday though. I need to do more things off of the computer. I've been so consumed with reading, writing, and collecting inspiration that I think it's actually giving me a mental block. I feel so inspired when I look at things but then when I actually go to make something I feel like I don't have an original thought in my head. I'm so worried about my ideas being too close to someone else's so I freeze up. I think I need to just stop worrying about everything else out there and just step away and make what comes into my head.


Does anyone else ever get inspiration overload? What do you do about it?

Monday, January 17, 2011

a book a month


I'm taking on another thing from my list of 101 things. And just in time too! It's the middle of January and I haven't started my "book a month" project yet. This will be book 1 of 33. That's how many months are in 1001 days if I did my math correctly. This is a special book though, as it comes with a little shameless family promotion ;).


This book was written by my grandmom's brother, or my great-uncle, Bill Richardson. It is a memoir of his time as a POW in the Korean War. My grandmom, being as proud as she is, bought nearly everyone in the family a copy for Christmas. On Christmas day I couldn't help but take a sneak peak. I picked a random chapter just to read a few words and I couldn't put it down. It's so interesting and even more so because someone I know went through this. It's an amazing way to be able to learn about your family history. I can't wait to really get into it!


There are some family photos included in the book too. This is a clipping from a newspaper that featured a photo of my uncle's family when they found out he was being released. My grandfather is the first on the left. My grandmom is right next to him and her mother is next to her. As my grandmom says, her mom was quite ahead of her times. Note the strapless top!


This is another newspaper clipping of a photo of him being welcomed back home. Overall he was in the POW camp for just under three years and despite all of that he did two tours in Vietnam! I can't imagine being brave enough to go back into that situation.

So that is a little piece of my family history I thought I'd share with you. If you are interested in this sort of thing or have a family member who's a history buff and might like this, you can buy it here.

Happy Monday everyone!

Friday, January 14, 2011

homemade italian dressing


The other day I got a craving for pasta salad and decided I wanted make my own italian dressing to go with it. I think I will always make my own now. The recipe I used from the parsley thief was amazing. The flavors were so much more full and fresh than they are in the stuff from the bottle. Worth the extra effort for sure.

Just mix your sugar and spices in a bowl with red wine vinegar.


Combine extra virgin olive oil and canola oil in a measuring cup and pour it into the vinegar mix in a thin stream, whisking constantly with a fork or, well, a whisk.


Add your chopped herbs on top and mix again.


At this point I was going to pour it into a cute mason jar and store it in the fridge but I decided to see how much I need for the pasta salad. I just chopped up a yellow and a red bell pepper, some mushrooms, and olives and mixed them with a box of tricolor pasta. The dressing was pretty much the perfect amount to coat all of this evenly so no leftovers this time. I'll have to make some more later!

Homemade Italian Dressing
recipe from the parsley thief

makes 1 1/3 cups

2 cloves garlic, minced
2 tsp sugar
2 tsp dried mustard
kosher salt + freshly ground pepper
1/4 tsp red pepper flakes
3 tbsp red wine vinegar
1/2 cup extra virgin olive oil
1/2 cup canola oil
1/4 cup finely chopped fresh basil leaves
2 tsp finely chopped fresh marjoram
1 tsp finely chopped fresh oregano

In a medium bowl, whisk together garlic, sugar, mustard, red pepper flakes, and red wine vinegar. Whisk together the two oils and pour into the vinegar mixture in a slow stream, whisking constantly to form an emulsion. Add the fresh herbs and stir in salt and pepper to taste. Store the dressing in a container for up to a week.

Pour it over your favorite salad mix or use it to marinate chicken! Nothing beats the fresh ingredients.

Thursday, January 13, 2011

overnight french toast


This is a little Christmas tradition I wanted to share because it is so delicious. And you can make it anytime of the year! It just became a tradition for us every Christmas because all the prep work is done the night before so you just pop it in the oven Christmas morning and that's it!

My mom learned this recipe from my aunt so I'm not exactly sure of its origins, but we've been doing this for years now. Once again, I slacked on picture taking this holiday break so I remade it this past weekend so I could post it here.

Start by making your brown sugar "sludge". Believe me, this is the best sludge you'd ever wanna eat. And its a special occasion so you don't have to feel guilty about it :).


Mix mix mix.


Grease a baking dish and pour the brown sugar goodness into it. Spread it around.


Now, you want to get a loaf of nice crusty french bread. It's the perfect bread for this. However, I decided I was going to make this fairly late at night. The first market I went to was out of pretty much all bread in the bakery. The second market had one loaf of french bread and one loaf of italian bread. Before I could locate the bread among all the empty baskets, some women swooped in and grabbed the last french bread. I had two options.. challenge her to a duel with the bread, or suck it up and try to use the italian. I was too committed to just give up so I pouted and grabbed the italian bread. It worked, just not as nicely. So do as I say, not as I do. Use french bread.

Cut up the bread into 3/4in to 1 in slices and line up on top of the brown sugar. You should be able to get neat rows of three when using the proper bread. Not this hodge-podge mess.


Mix up your egg mixture and pour it all over, making sure to coat all of the bread.


Now cover this up with foil and put in the fridge overnight. Get some sleep!

When you take it out of the fridge in the morning, most of the egg mixture will be absorbed. Uncover it and put it in the oven for a half hour. Go open your Christmas presents. :)


When it comes out the edges will be nice and crusty and inside will be soft and hot. The brown sugar mix on the bottom really completes it. After you scoop your pieces out, spoon some of the remaining brown sugar on top. ;)


Overnight French Toast

1/2 cup butter, melted
1 cup light brown sugar
2 tbsp corn syrup
dash of ground nutmeg
1/4 tsp ground cinnamon
1 loaf crusty french bread
6 eggs
2 cups milk
1 1/2 tsp vanilla extract

Melt butter in a medium bowl. Stir in brown sugar, corn syrup, nutmeg, and cinnamon. Pour into a greased 9x13 in baking dish. Cut bread into 3/4 in to 1 in slices and line up across brown sugar mixture. Beat eggs with milk and vanilla. Pour egg mixture all over the bread, making sure it all gets coated. Cover and refrigerate overnight. In the morning, uncover and bake for 30-35 minutes at 325F.


The perfect start to a special day.


Follow my blog with bloglovin
Related Posts Plugin for WordPress, Blogger...