
nav bar


Thursday, October 27, 2011
catch you on the flip side

Just wanted to pop in real quick and let you know I'll be in the sky in the a.m. tomorrow, headed to Florida for The Fest. What fest? THE Fest. Nobody believes me when I tell them that's what it's called. Anywho, Charlie and I went last year and this year is the big 10th anniversary show and quite possibly that last time that all situations will align correctly to allow us to go. So we go.
Just wanted to fill you in since I'm in the middle of a giveaway here on the blog. And because while I do have an iphone now, lord knows if I'll be savvy enough to use the social media properly and stay in touch with the world. I'm still doing things like accidentally favoriting random tweets about nothing when using Twitter on my phone cause I swipe and hit random things like a toddler with no dexterity. I get really paranoid I'll accidentally retweet something totally inappropriate and then I'll have to get rid of my Twitter and die. And now you know what goes on in my brain.
So since I'll be gone for the weekend I decided I might as well keep the giveaway open until Sunday at midnight EST. I'll come back Monday night and post the winner. So that's what's happening there. Now I need to sleep because morning comes waaaaaaaaaayy early tomorrow and I'm clearly in ramble mode from all the tired I'm feeling.
Have a great weekend, keep entering the giveaway, and I'll see you Monday. :)
Wednesday, October 26, 2011
much ado about eggs
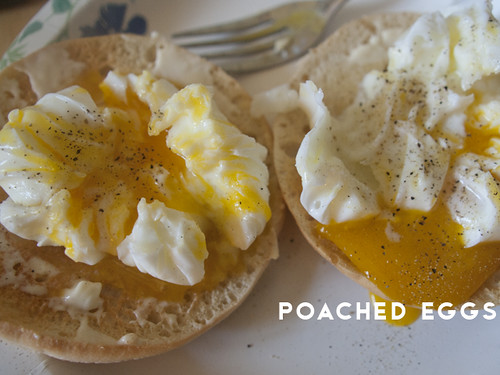
Eggs. There are infinite ways to prepare them and everyone has their own special preference. Scrambled is good, but unless you cook them into oblivion, there's not much screwing up that can be done there. But then there's the variety where the egg and yolk stay intact. And that can be screwed up big time depending on your preferences.
I like mine with the white fully set and the yolk in its "dippy" form. This would be considered over-easy in fried egg speak. I've read every suggestion on how to prepare these but no matter what way I've tried, I either end up with a creepy, crusty over-cooked bottom, a partially set yolk, or a smashed yolk from a quick flip. All of these situations render eggs inedible to me.
This led me to start soft boiling them which was my method for a while, but peeling a soft boiled egg is a pain to say the least. And poaching looked way too difficult with all the suggestions of room temperature eggs and vinegar and whirlpools.. until I came across this amazing tip one day! Poach them in a pouch!

It couldn't be easier and it results in fully set whites with a runny yolk and no scary brown crust in sight! And it takes about 5 minutes.
All you do is tear off a piece of plastic wrap and spray a little cooking spray or rub some olive oil on it. Place it into a small dish (I used a measuring cup) and crack the egg inside. Gather up the edges and give it a twist. Secure it with a bag clip or a twist tie so that the pouch doesn't come undone. Pop them in a pot of simmering water.. you want gentle bubbles so the bag doesn't bounce around and fall apart. Cook for 5 minutes if you want them as shown. Cook longer if you like them more set all the way through. Remove them from the water, unclip (don't burn yourself!) and unwrap. Done!
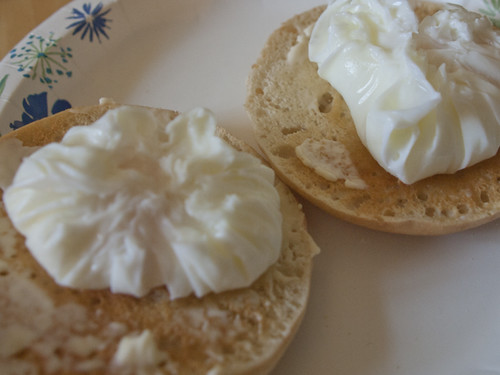
I put mine on top of a toasted and buttered bagel thin.
Then, smash! Top with salt and pepper.
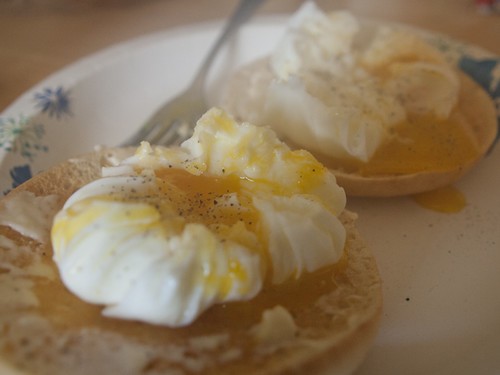
I just thought this was a handy tip that some other picky egg eaters might like. :)
Hope your week is going well! 2 more days to enter the Moleskine giveaway!
Tuesday, October 25, 2011
an outfit for apple picking
I noticed yesterday that I had a lot of photos from our apple picking trip, so I decided to split them into two posts and make my first outfit post with a few!
Super comfy but still nice for a day out..

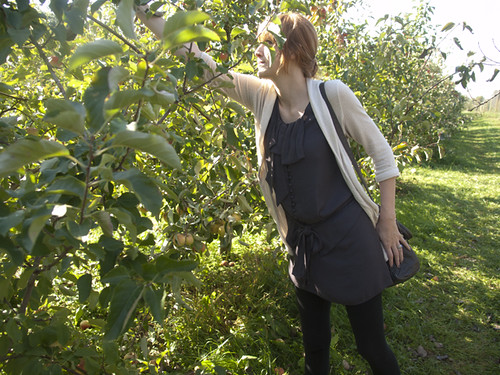
dress.. forever 21
leggings.. newport news
cardigan.. urban outfitters
oversize bag.. urban outfitters
cardigan.. urban outfitters
oversize bag.. urban outfitters
Don't mind my apple picking face. Lots of concentration there. And sunlight.
The dress is one of my favorites. I think it has a very 20's influence with the column of tiny buttons, the little tie at the top, and blousing from the belt. Also, these are the best leggings I've ever owned. Leggings are like a staple for me and after extensive internet research, I finally found a pair that were long and not see through. What more could you ask for in leggings? :)
The cardigan and bag were both gifts and I love them. The cardigan is great for in between weather and even layering under a long sleeve sweater when it's a bit colder. And I absolutely love oversize bags. This one is perfect because I can actually fit my school books in it so I don't have to bring two bags to class anymore!
I always like seeing other people's outfits so I hope to do more of these in the future. :)
Have a great week! 3 more days to enter my blogiversary giveaway!
Monday, October 24, 2011
apple picking

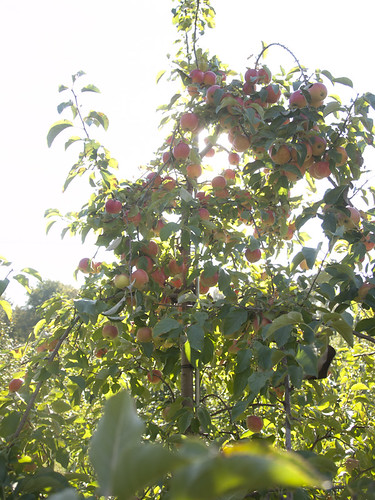
A couple weekends ago, Charlie and I went apple picking. I was so excited to find a farm near us that let you pick your own apples! When I was little, my family and I always went to this one farm that had big hay mazes, crazy Halloween characters sculpted with hay and chicken wire, and rows upon rows of apple trees, ready for the picking. In more recent years, that place's apple crop has become slimmer and slimmer, not entirely sure why, until they stopped letting you pick your own altogether. No fun. So after a little research, I was able to find several places where we could go to pick our own. Thankfully, the area where Charlie grew up is lousy with farms so we didn't have to go too far to find one. :)
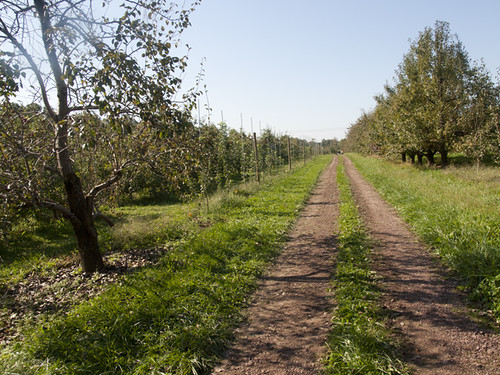
It was a beautiful day and an awesome place. You can pick all sorts of things there throughout the year. I want to go back in the summer and get some berries.
You can pick wildflowers too!

There's nothing like knowing exactly where your produce came from. And by doing the middle man work yourself, they are infinitely cheaper than in the supermarket.

Charlie insisted that the best ones were high up so he scaled a ladder to grab some. We weren't sure if we were supposed to use the ladders, but hey, they were just sitting there and didn't have any "do not climb" signs, so fair game!
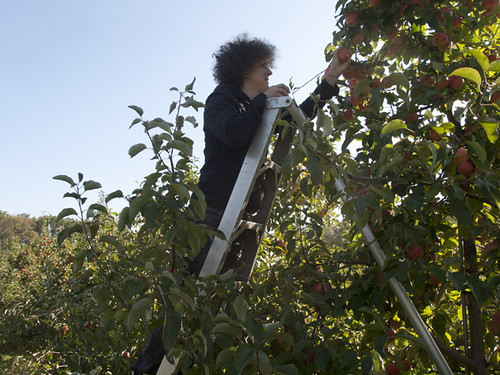
I'm pretty sure this is his photo debut on my blog. He wanted to make a grand entrance but I think our apple date is pretty grand. I'm glad I got him on here too before he cuts those curly locks. :)
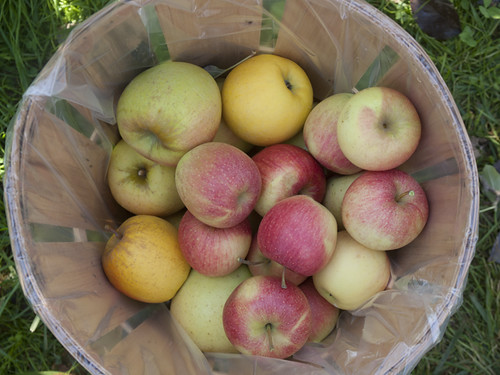
Now hopefully we'll have time to grab some pumpkins soon because Halloween is just a week away!
Have a great week!
P.S. Have you seen my blogiversary giveaway? I'm pretty pleased with the turnout so far so I'm going to close it on Friday at midnight EST. I'm going away this weekend so I'll announce the randomly chosen winner on Monday! Good luck and spread the word if you don't mind! (It'll gain you an extra entry!) :)
Friday, October 21, 2011
one year + a giveaway
I'm not sure if you know this, but one year ago today I started this blog. So today would be my one year blogiversary! I went back and reread my very first intro post and it kind of made me laugh because I feel like I sound kind of serious. No photos whatsoever, just a few paragraphs trying to explain myself and my current career switch so that my life might make more sense to anyone willing to read. :)
Oh, remember when this was going to be Halloween Treat Week? Yea, here's something you should know about me.. I'm a great planner, but not always great at executing those plans. After a few flopped recipes that didn't seem blog worthy, I threw my hands up and decided that as good recipes came along, I would post them randomly. So that's where that is.
So today, for fun, I have some stats about the blog from over the past year. Then, I have a little giveaway for you because I want to thank you for making this an amazing year for me. My lil blog is still in its growing phase but I think I've come a long way from feeling like I was talking to a wall for months, to actually having people comment and carry out conversations with me!
But anywho.. the fun part. These are the most popular posts from my first year. It may even be how some of you found me!
Top 10 most viewed blog posts..
made in the 80's
chronic bitchface
ball jar jack-o-lanterns
hair dye fever
summer thoughts
gingey
pumpkin pie spiced coffee
homemade hot chocolate
caramel buttermilk loaf cafe
stuff i love
My thoughts on this.. if you want to drive more traffic to your blog, write a post about 80's clothing. Totally kidding, but you would not believe how many people have come to this blog from looking up 80's costumes and such. Crazy! I bet some of you reading even got here that way! ;)
Also, I'm glad many others related to me on the chronic bitchface front. Kris Atomic is a damn genius for finally giving that plight a name. I'm glad you guys found me cause we bitchfacers gotta stick together! :)
I'm not going to go on about all of them, don't worry ;) but I was surprised to see my jar pumpkins shoot up there so fast! I love those little guys so I'm glad to see them get their time to shine.
I also had a lot of people find me from looking for hair dye tips, mostly about bleaching and putting light colors over dark colors and such. If anyone would like to talk about that at any point, feel free to email me, twitter me, whatever, cause if you can do it to hair, I've probably done it, and I'm not bald yet. ;)
So that's probably enough reminiscing.. onto the giveaway! This is my very first giveaway so I tried really hard to think about the majority of my readers' interests and this is what I kept thinking.. a Tenpenny Splendid reader is a lot like me.. we all like to make lists, obsessively even ;) ..most of us are artists or aspiring artists or experimenting with new crafts and techniques.. and we like to be very planned and organized.
So..
One lucky reader will get a Moleskine gift pack!
 {source}
Giveaway is closed! Thanks for entering!
1. Follow Tenpenny Splendid on either GFC or Bloglovin, and let me know you're doing so in the comments.
Additional entries.. (make a separate comment for each)
2. Follow Tenpenny Splendid on Twitter.
3. Tweet about this giveaway.
4. Write about the giveaway in a blog post.
That's it! I'll have the giveaway open for at least a week but maybe longer if it's sad and no one enters. ;)
Good luck and have a great weekend!
Tuesday, October 18, 2011
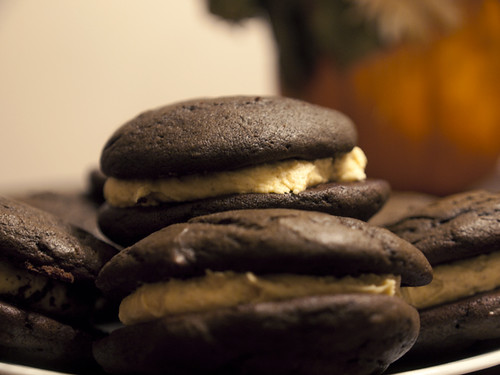
pumpkin cream whoopie pies
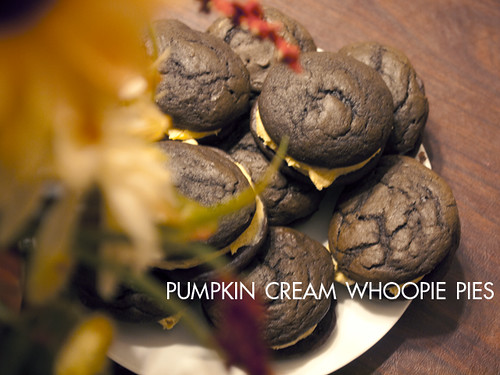
This was my first time making whoopie pies, which I've been wanting to try for some time. I love that they're so versatile that you can customize them for any season or holiday. From colors to flavors, the possibilities are pretty much endless! So of course, I went for some pumpkin influence this time around. :)

These couldn't be easier to put together. But riddle me this, Batman.. why did my first two trays come out super cracked on top, my third tray slightly cracked, and my last tray almost completely smooth? I was a little bummed at first since most photos I've seen of whoopie pies have had perfectly smooth tops, but then my last tray came out smooth. I don't understand where the discrepancy happened. Was it batter amount? Oven temperature? Black magic? I don't know. If anyone reading this is a whoopie pie connoisseur, feel free to share your knowledge!
Besides my existential crisis about whoopie cracks, these were pretty relaxing to make. Very simple and agreeable little desserts, these are!

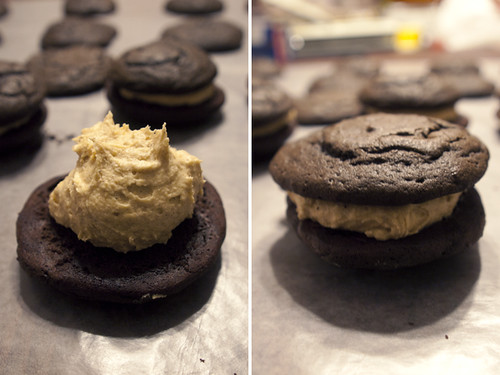
Mystery smooth topper.
This is a great recipe too. The cookies aren't too sweet which is good because the filling is a buttercream, which is very sweet. The flavors in the filling are pretty amazing. It tastes like pumpkin pie! I wouldn't mind slathering a whole cake in this.
Pumpkin Cream Whoopie Pies
from Simply Modern Mom
Pumpkin Cream Whoopie Pies
from Simply Modern Mom
Cookies
1 stick unsalted butter, room temp.
1 1/4 cups sugar
1 large egg
1 cup buttermilk, room temp
1 tsp vanilla extract
1 3/4 cup ap flour
3/4 cup unsweetened cocoa powder
1 1/2 tsp baking soda
1/2 tsp baking powder
pinch of kosher salt
Pumpkin Buttercream
1 stick unsalted butter, room temp.
1-2 tbsp milk
1/4 cup pumpkin puree
1 tsp cinnamon
1/2 tsp nutmag
1 tsp vanilla extract
up to 2 lbs confectioner's sugar
Preheat oven to 400F.
In the bowl of a mixer, cream the butter and sugar until fluffy. Add egg, buttermilk, and vanilla, mixing until combined. In a separate bowl, combine all dry ingredients. Add them to the mixer a little at a time, mixing until just combined.
On a tray lined with parchment paper, spoon two tbsp of batter per cookie. Leave about three inches of space around each cookie. (I got six per tray.) Bake for 8 minutes, until edges are firm but center is soft. It should spring back when touched. Let them sit on the tray for two minutes and then move them to a wire wrack to finish cooling.
Add all buttercream ingredients to the bowl of a mixer and mix well. Add as much milk and confectioner's sugar as you need to get the amount and consistency you want. (I used 1 tbsp of milk and about half of the two lb bag of confectioner's sugar which made a good thickness and a decent amount for all 12 pies. Use more if you want the cream piled higher, or add more milk for a thinner cream.) Spoon a dollop of cream on the flat side of one whoopie pie and sandwich with the flat side of another.
Mange.
That's it! If you didn't see the first super fun adult treat recipe, check it here!
Monday, October 17, 2011
caramel apple jello shots

While caramel apples are more fall-generic than specific to Halloween, I felt like it was an appropriate recipe to post in the Halloween spirit as that's when it's time to bring out the boozy adult treats!
Thus we commence Halloween Treat Week. You may remember her campy, somewhat flashy older sister, Halloween Craft Week. If you're not familiar, you may go here, here, here, or here.
;)
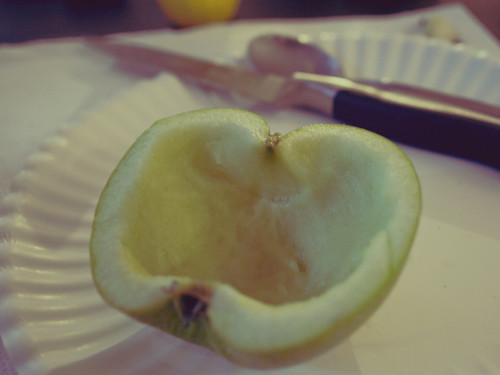
This is a little labor intensive but not as hard as it may seem. And the response you'll get when you hand these out at a party is well worth fruit excavation. So grab an apple and cut it in half from the stem to the bottom. Take a spoon and start digging out some apple guts, leaving about half an inch or so around the border. Don't dig too deep or you'll poke a hole and have a leaky apple!
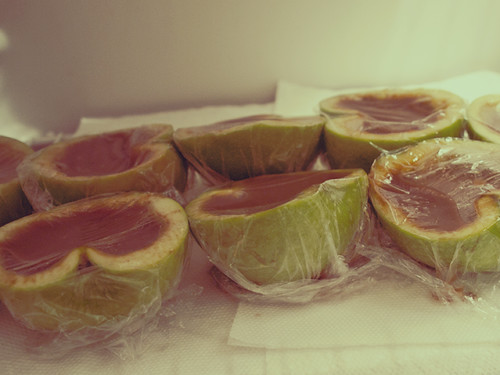
Make up your boozy jello. Line up your hollowed apples in a deep baking dish so that they won't tip over when you pour the jello. I was at the boyfriend's apartment so I had to make do without a pan. I just laid a paper towel over a shelf in the fridge to minimize messiness, filled each apple, and wrapped it in saran wrap to keep it from spilling. This also worked as a good way to transport them since they were going into a cooler. You want to fill the apples with jello as close to the edge as possible and then move them to the fridge to solidify.
Once they're all firmed up and you're ready to serve, slice each half into four pieces.
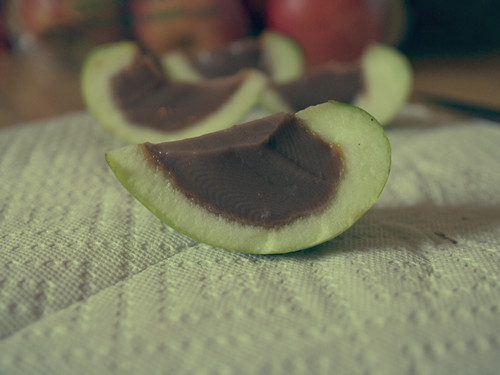
Clink your slices and down the hatch! Well, chew the apple, then down the hatch. ;)
Caramel Apple Jello Shots
adapted slightly from That's So Michelle
5 granny smith apples, cut in half (makes 40 shot wedges)
lemon juice
1 envelope knox gelatin
1/2 cup water
1/2 cup milk
yellow food coloring
1 envelope caramel flavored hot chocolate (regular works fine too)
1/4 cup sugar
1/4 cup butterscotch schnapps
3/4 cup Van Gogh Chocolate Vodka*
Dig out the insides of each apple half, leaving about a half-inch border around the edges. Rub some lemon juice on the edges so they don't turn brown before you serve them. Set the hollowed out apples aside in a deep baking dish, making sure they are packed tightly and stay upright. Grab a pot for the jello and mix the water, milk, and hot chocolate in the pot, stirring until all the chocolate is combined. Sprinkle the gelatin on top and let it sit for a few minutes.
Turn on the heat to medium-low and mix until the gelatin is dissolved. Add the sugar and simmer for a bit until the sugar is combined. Add a few drops of yellow food coloring until you get a nice caramel color (about two drops or so). Let the mixture cool until it's just warm, and then add the schnapps and vodka.
Pour or ladle the jello into the apples and refrigerate until they're set. Slice each apple cup into four wedges and serve!
*The original recipe suggests caramel flavored vodka which makes sense, but after searching three state stores, an employee finally informed me that Van Gogh doesn't make the caramel flavor anymore. And neither does anyone else. You can find Swedish Fish and Bubblegum flavors, but no caramel. Go figure. Anyway, all these flavors combined tasted pretty caramel-y according to all those who enjoyed them so the substitution seems to work well enough.
Have a great week!
Saturday, October 15, 2011
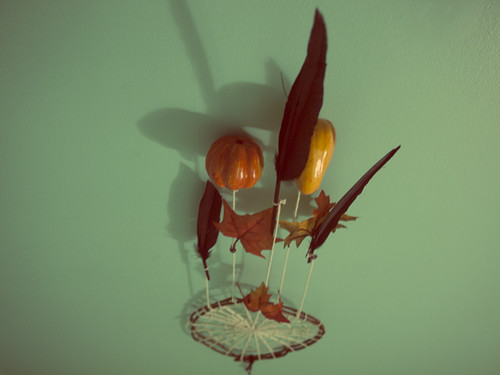
raven feather dream catcher
When I was little, my parents always used to buy me different kinds of craft kits for Christmas. One year I got a dream catcher kit. I always tried to make it and worked on it from time to time but I think it was a little above my skill (or patience) level back then. The kit has since vanished but I always thought it would be cool to try an make a dream catcher someday. This little guy is far from the intricate lacing and beadwork of legit native american dream catchers, but it's my own October take on it. :)
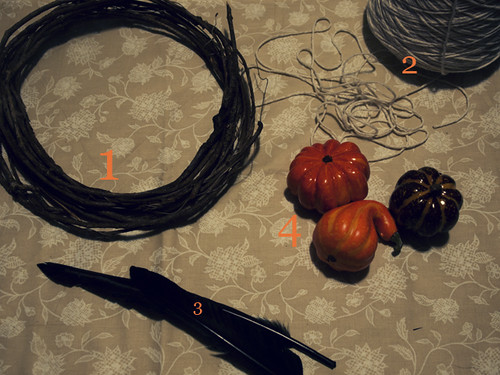
The supplies are pretty simple and can really be modified to fit what you have laying around.
What I used..
1. wooden wreath (any sturdy circular item will do)
2. cotton twine
3. decorative feathers
4. fall harvest decorations
You can hang anything you want from yours but this is what popped into my head when I got the idea.
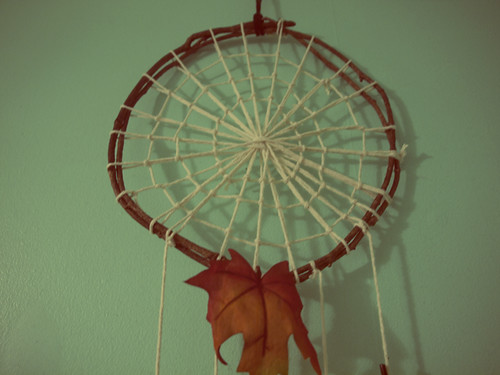
I started by undoing the wire wrapping on the wooden wreath. I then uncoiled two rounds of wood, cut it, and formed it back into a circle. Then I just secured it with a piece of the wire (1). After that, I knotted the twine around the branches, wrapped it around to the other side, and tied it off back where I started (2). Then, same thing perpendicular to it (3). This gives you the basis for your spider web pattern, which you create by just wrapping the twine around the branches and back around the center point, moving as you go (4).
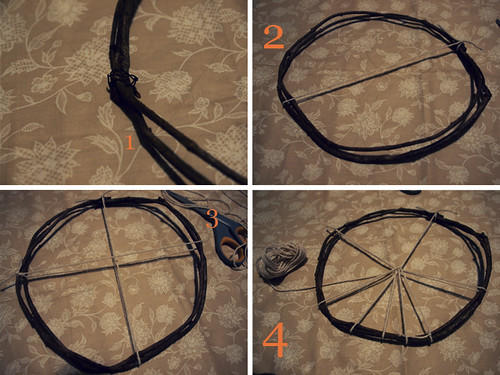
Go all the way around the circle until you have a wagon wheel pattern (1). Next, cut off some twine and tie a knot around one of the "spokes" about an inch or so from the frame. Loop the twine around each spoke as you go around the circle (2-3). Tie it off once you reach the starting knot and trim any excess twine (4).
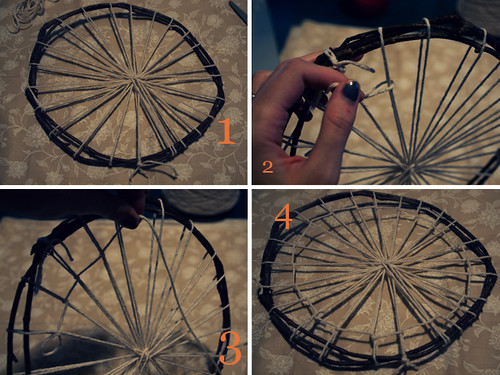
That will complete the first tier of the web. Make as many as you want depending on the size of your circle. Three was good for me.

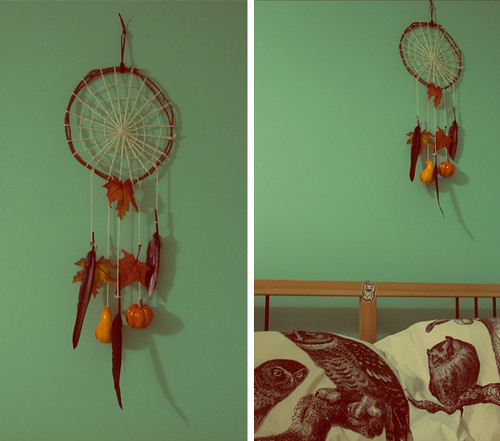
When you're done the web, tether some leaves, gourds, feathers, what have you, to the bottom of the ring. Go at it until it looks the way you want it! Then just loop some string through the top so you can hang it and let all your bad dreams get caught up in this web. ;)
See the other Halloween craft posts here..
creepy silhouettes
ball jar jack-o-lanterns
creepy faux terrariums
Hope your weekend is going well! :)
Friday, October 14, 2011
creepy terrariums
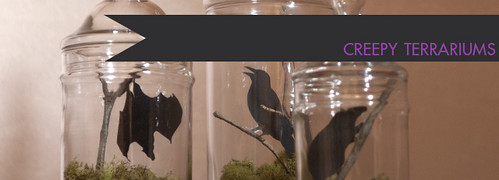
Here is craft project number three! I'm a little behind in getting these up cause a lots been going on. For one I got an iphone! Yay! So I've been playing with that and trying to get acclimated. Anyway, I'll be posting another later tonight or tomorrow morning.
This project turned out more awesome than I thought it would. I was pretty pleased. This one is less of a how-to and more of a serving suggestion. You can really put anything you want in here, this is just how I did it.
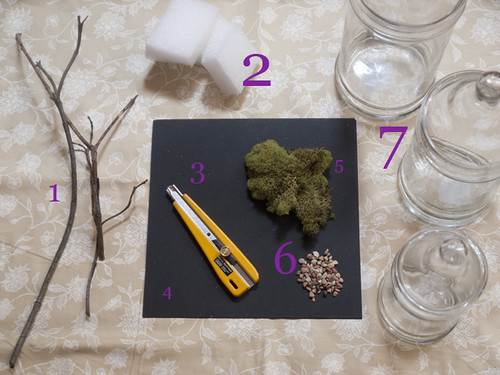
What I used..
1. sticks from my backyard
2. pieces of a foam block
3. x-acto
4. black cardstock
5. faux moss
6. pebbles
7. glass jars
First I printed some silhouettes of creepy dudes from the interwebs. I grabbed a bat, a rat, and a raven. I just traced the creatures onto the cardstock and cut them out. Then I taped their feet onto the sticks, stuck them into the foam for a little stability, and put them in the jars. Then I covered the bottoms with moss. That's it! Use your imagination and add all sorts of plants and things.


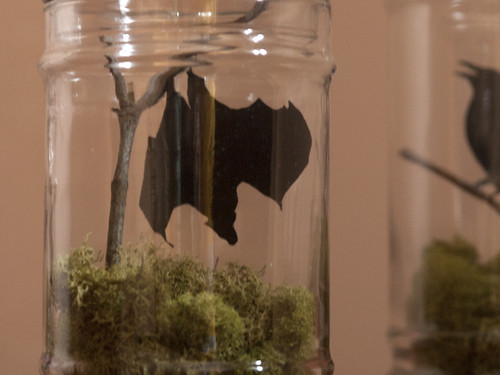
The little batty is my favorite, but then bats are my favorite animal. :)

These are my favorite project so far. And they can totally be updated seasonally!
If you haven't seen them yet, check out the first two crafts:
creepy silhouettes
ball jar jack-o-lanterns
Happy weekend!!
Wednesday, October 12, 2011
ball jar jack-o-lanterns

Craft number two is another candle related craft. After all, most Halloween fun takes place at night, yea? This one is super easy and very undo-able after Halloween so that you can wash out your ball jars and go back to sipping iced coffee out of them in no time. ;)
Here's what ya need..
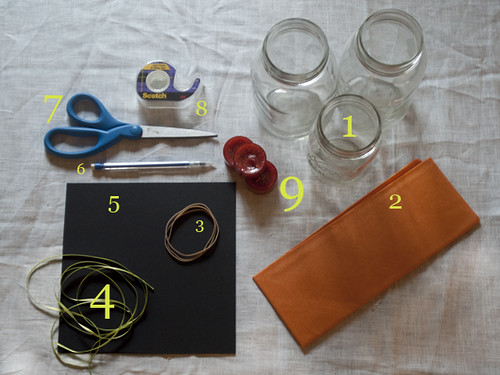
1. whatever size/number jars you would like
2. orange tissue paper
3. as many rubber bands as jars
4. green ribbon
5. black cardstock
6. pencil
7. scissors
8. tape (or glue)
9. tea light candle for each jar
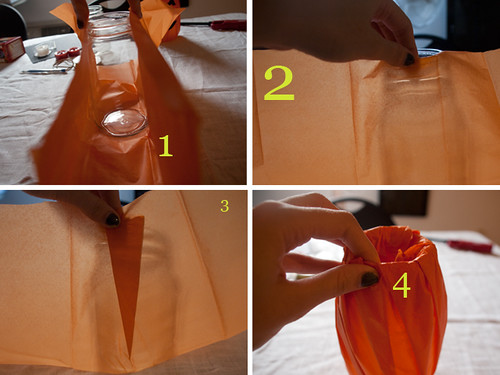
Start out by cutting a square of tissue paper that, when folded upwards, just reaches the lip of the jar on each side (1). Lift a side of the tissue paper (2) and grab some about an inch or two over. Fold that over to the beginning so you get a pleat (3). Continue to do this all the way around the jar (4). Tucking any excess paper into the jar helps keep it from falling apart.
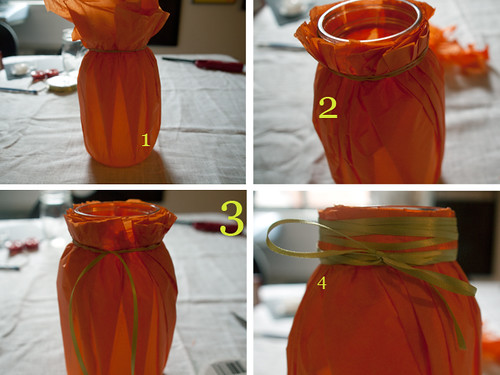
Wrap one of your rubber bands around the top of the jar, nice and tight. Fluff out all the excess paper at the top (1) and cut around the edge so the paper is level with the lip of the jar (2). Tuck the end of a piece of ribbon under the rubber band, leaving a few inches hanging down (3) and wrap the rest around the jar, covering the band and as much of the top as you want. When you've wrapped enough, bring the end around to meet the tail you left and tie them in a bow (4)!
Cut out some face pieces from the card stock (1) and put a little roll of tape or dab of glue on the back. Give your pumpkins some personality (2)!

Plop a tea light down there, light it, and watch them glow!

I think these would look awesome outside on the step as you give out candy or even as a little table center piece. They even light up pretty well during the day! I have one lit now as I type this and watch Hocus Pocus. I think cheesy Halloween movies are my favorite. More-so than scary ones.
If you missed yesterday's Halloween craft you can check it here! Also, stop by tomorrow for number three!
Hope your week is going well!
Tuesday, October 11, 2011
creepy silhouettes
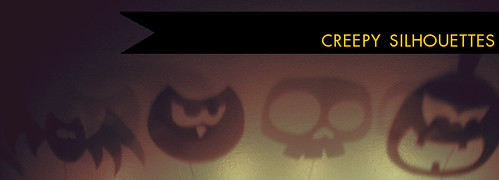
Here is my first project for my little Halloween Craft Week! Put these candles anywhere you want to cast creepy shadows during October. :)
Here's what you need:
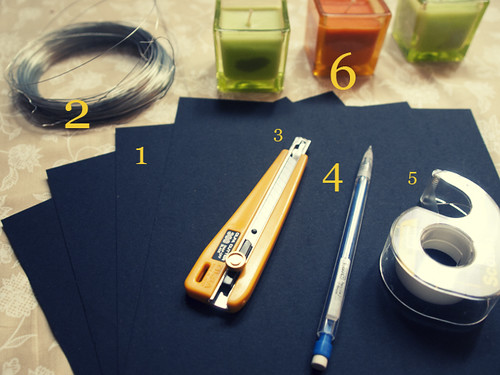
1. black cardstock
2. thin wire
3. x-acto knife
4. pencil (only if you're drawing your own shapes)
5. tape
6. candles
I used these super cute and free templates from Paper Crave. You can either pop over there and download them or use whatever else you want!

Just print out the template and tape one on top of your cardstock. (I printed them all full size except for the bat, which I printed at 75% just because I was afraid it might be too big. But do as you please!) I just used my x-acto to cut right through both pieces and then punched out the cardstock shapes when I was done.
*Tip! I used to have an incredibly hard time cutting round shapes with an x-acto but I found that if you use one hand to guide the paper as you cut, it goes a lot smoother. By that, I mean turn the paper as you go, not the blade. It seems to make cleaner cuts that way.*
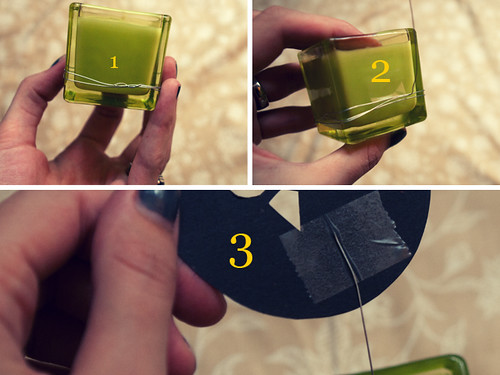
Next, grab a candle. Cut enough wire so that you can wrap it around the base about two times, with enough left over to hold up your cutout. Tuck the end of the wire around the wire loops so it holds (1). Bend up the leftover wire and tape the loops to the back of the candle so they stay in place (2). Tape your cutout to the end of the leftover wire (3).
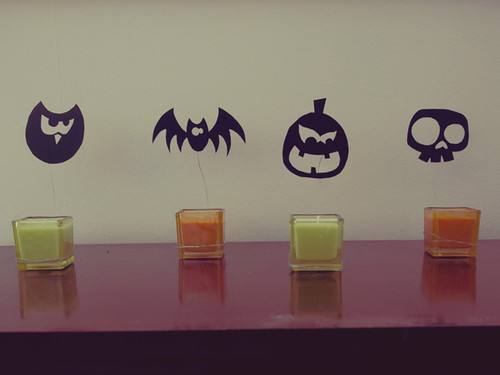
Now you need to set up the candles and adjust the wire. Make sure the cutouts are far enough from the flame that they won't catch fire! It helps to light the candles so you can see a good height and distance for the best silhouette.
Then just light them up and you're good to go! Move them closer to and farther from the wall to get bigger or darker shadows.

Ta-da! Creepy!
Check back tomorrow for more festive craftiness! Leave a link in the comments if you're making something too so I can check it out! :)
Subscribe to:
Posts (Atom)