nav bar


Monday, July 25, 2011

epic cake


Last Friday I made what I like to call the "epic cake" for my brother's birthday. I asked him what kind of cake he wanted and he did not hold back. He said that he wanted a brownie layer involved and that it should probably be on the bottom because "it would make a good bottom layer." Then there should be two layers of chocolate cake with those crunchy things that Carvel has in their cakes. It should all be covered in some sort of chocolate frosting, "I'll let you decide what kind is best." And "you know those darker, thicker fudge swirls that are on top of the frosting? Yea I want those too."

Tall order for sure, but ask and you shall receive.


It took an entire day but it came together! I was pretty concerned about how some of these things were going to work out, especially since I was just hodge-podging a bunch of recipes together, but somehow it all worked out.

I think I was most concerned about the brownie layer. In the end it was pretty easy to shape and transfer from pan to plate. I used the bottom of the cake pan for size and put it on top of the brownies and traced the circle with a knife. Then I segmented the pieces outside of the circle into smaller, removable pieces. Once they were gone, I loosened the circle with a spatula and then flipped it onto a transfer plate. Then I flipped that onto the cake plate and breathed the biggest sigh of relief.


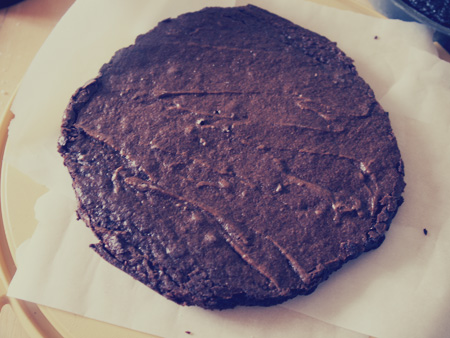
What's good about the fudgy-ness of brownies is that you can push in the edges, minimizing crumbs when icing it and helping to shape it a little bit better.

After this came the buttercream and "crunchies." I was unaware that you could actually buy the crunchies until after the fact so I made my own. I wanted to get some sort of chocolate wafers but the store didn't have any so I pulverized some chocolate teddy grahams instead. :)


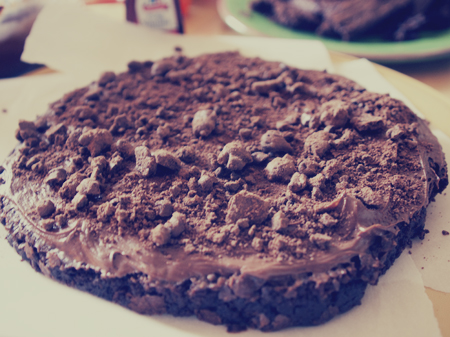
As you can see in the "Anatomy of a Cake" above, next came cake layer one, more buttercream and crunchies, and cake layer two. All of this was wrapped in a thick layer of the chocolate buttercream.


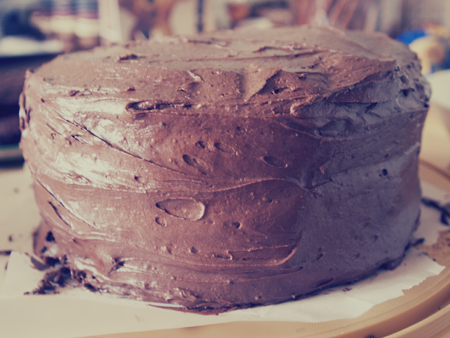
I was a little nervous about the "fudge swirl" part, but after a little searching I found an amazing recipe for delicious chocolate fudge. It made way more than I needed so I saved the rest and have every intention of spooning some over vanilla ice cream at some point. Yum.

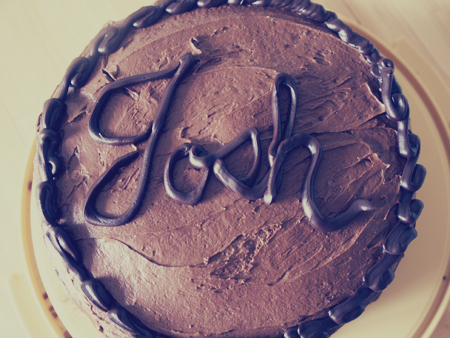
I tried to get a little decorative with the fudge but it's not my best work. I only had Ziplock bags to work with for piping it on so I did my best. I used to write on cakes all the time when I worked at Baskin Robbins in high school and I was actually pretty good at it! Makes me want to invest in some real tips and piping stuff when I have some extra money laying around.


Consensus? My brother loved it, which is really all that matters. I did my famous eat-the-cake-and-leave-impressive-walls-of-frosting-still-standing-in-place trick because it was wayyy too much for me to handle. There's not much left in the way of leftovers so the rest of the fam must be grabbing a slice here and there.

So I'd have to give this final ruling.. if you're one those people who can consume copious amounts of chocolate without flinching and order things off a menu that are called "super chocolate death extreme with chocolate on top", than this cake is absolutely for you. If the words "chocolate death" make you run like you would from actual death, than it's probably best to avoid this.

I'll post the recipes on this later since this post is already forever long. Happy Monday!

Wednesday, July 20, 2011

frames

Charlie and I have been brainstorming a lot about frame arrangements since he got his new place. As a photographer, he has tons of photos to be framed plus a lot of fun screen prints and such he's collected over the years. I've been trying to compile some inspiration and have found some amazing arrangement ideas.

{source 1 + 2}

Even though there's no photos I think the first one is my favorite. Besides the fact that I love those greens, I also love the idea of having varying shapes.

{source}

Also loving the mismatched feel of the one above. This would work well for a collection of frames from yard sales or thrift stores. Especially since frames can be ridiculously expensive. :/

{source 1 + 2}

Some more stair arrangements. The walls next to stairs are sort of asking for frames aren't they? There's no furniture against them or anything so what else would you do with them?


I think the ones above look amazing.. layering frames is something I never would've thought of! I saw them all here, where you can actually download templates for creating these frame arrangements. It looks like they were originally from Pottery Barn but I don't think that link on the site works anymore. Still good inspiration though.

If we figure out something awesome I'll be sure to share it. :) Have you seen any good frame inspiration? If so, do share!

Tuesday, July 19, 2011

pita chips

I hate being MIA so much but life happens I suppose! This summer is flying by me and I feel like I haven't even done any summery things yet! I need some beach in my life, that's for sure. That and a picnic. And an outdoor movie. Oh the plans I have.

Today after some bookstore browsing and iced latte sipping, I decided to make some pita chips! I'm trying to make more and more things homemade because I like the idea of knowing exactly what's in what you're eating. It sounds healthier, tastier, and just like an all around good idea. :)


They were really easy to make and have been a big hit with my taste-testers so far! They're super versatile too.. you can season them with anything that strikes your fancy. Today, that was kosher salt and basil for me.


Grab some pitas and start slicing. I used a pizza cutter to cut them into fours. Once you have your wedges, pull them apart so you now have two. You'll get eight chips from one pita. I had to go at the edge with a knife for some cause they didn't all want to separate.


Line some baking sheets with parchment or foil and lay the wedges down with the outsides facing up.


Give them all a light brush of olive oil.


Now's the time to add your seasonings. I sprinkled on the kosher salt followed by some basil.


Pop em in the oven and bake until the start to get golden and crispy. Keep an eye on them so they don't burn!


Let them cool and enjoy your loot! I had six pitas so that gave me 48 chips. Not bad.

Now if you'll excuse me, I have some bell peppers and chickpeas that are begging to be turned into hummus for these bad boys. :)


Homemade Pita Chips

pitas
olive oil
seasonings

Preheat your oven to 375F. Slice each pita into four wedges and then separate each wedge into two halves, giving you eight wedges from each pita. On a lined baking sheet, place about twelve wedges at a time with the outside facing up. Brush each one lightly with olive oil. Add any seasonings you like next. Pop them in the oven, one tray at a time, for 7-10 minutes. Keep an eye on them and take them out when they look golden and crispy. Let them cool and then bag to keep fresh. Enjoy!

Monday, July 11, 2011

kutztown

Whew! Last week was a busy one. I went to Kutztown with my family on Tuesday, me and Charlie's five year anniversary was on Thursday, and my mom's birthday was on Friday. We haven't totally celebrated our five years yet since it fell on a Thursday and this weekend was busy but we at least wanted to spend Thursday night together so we were with each other on the actual date. We'll celebrate for real on an upcoming weekend and do a bunch of our favorite things to celebrate a pretty decent milestone. I also have a fun gift in the works that I'll share later!


The Kutztown Folk Festival is something I've been going to with my family for a few years now. It's a fun little Pennsylvania Dutch fest where they have a bunch of German food, crafters, music, and a farmer's market.

There's some pretty talented crafters there but I like to go for the antique section. I would be stoked to walk out of that place with everything in sight. There are amazing finds for a steal! There's everything from antique tools, dishes, and furniture, to vintage packaging, cameras, and jewelry.

This year I picked up a vintage blue glass ball jar for myself. It was the only one there and I've been wanting to get my hands on one for a while.


As part of a housewarming gift, I got Charlie this vintage movie camera to go with his ever-growing vintage camera collection. I was so happy when I saw this one there because I knew he didn't have a movie one yet. 15 bucks. Mega score.


It's from 1956 and seems to be in perfect working condition so hopefully we can find some film for it and have some fun!


It has all of the original paperwork in the box and lens caps and everything. The woman who sells these takes amazing care of her things. All the original packaging is pretty immaculate for being almost 60 years old.


We picked up some jams and preserves at the farmer's market and I spied a stack of packaged honeycombs and had to grab one. I don't know what I'm going to do with it yet but I was fascinated by it and will find some sort of use for it. Any suggestions? I've actually seen a recipe or two that called for a honeycomb, but can I find them now? Of course not.


My mom also grabbed a jar of honey and asked the guy if it was local. I laughed a little, having a flashback of the restaurant scene in Portlandia. :)


Other than that I've been helping Charlie get his new place together which is coming along nicely. We hung some artwork last night and it's looking cozier by the minute. Hope everyone's summer is going well. Who knew it was July already?! Jeeez.

Sunday, July 3, 2011

patriotic cake pops


I'm posting today because I know I probably won't be able to tomorrow. I'm helping Charlie get all settled into his new place. Yesterday was a lot of carrying moderately heavy things up two flights of stairs and building Ikea furniture. I was fine before I went to bed last night but woke up super sore today. So tonight and tomorrow will hopefully be minimal lifting and more organizing and arranging. The stuff I love. :)


Last night was my first attempt at making cake pops. Oh boy. I watched this video by Bakerella and thought, "Hey, I can follow simple directions! That looks easy!" False. I don't know if it was the heat or what but these were the most disagreeable little pastries. We had the ac on but I guess the kitchen was still a little warm. I formed the balls and chilled them in the fridge for two hours, which rendered them pretty firm and cold, but when I dipped them into the chocolate they kept falling off the stick! I was about to fling one across the room when I suddenly came up with a different way of going about it.


I dipped the sticks in the chocolate and stuck them into the cake balls as per the instructions, but then I just left them all on the tray and stuck them back in the fridge instead of dipping the balls in the chocolate. I took them out again after about an hour and it worked like magic. Being hardened on to the stick first helped keep them on during the dipping process. The only problem was I was only able to get about ten done before the balls-in-waiting started to get too warm again. So I had to do them in shifts but I eventually got them all done. I don't know what my deal is because Bakerella didn't seem to have such a problem. Oh wells.


The cake is red velvet with cream cheese frosting and the outside is white chocolate colored with blue candy coloring, topped off with white nonpareils. Red, white, and blue! Festive and delish.

I made them to take to my aunt's house today for a 4th of July bbq, but there were plenty of rejects from my little setback that my family have been taking care of before we go. I'm glad they are because I certainly can't. I love the things, but me and sweets, nope. I bit the one for the photo and then stuck it back in the fridge for later because that little dose of sugar was all my tum could handle!

So happy (almost) 4th of July! Go bbq, have a cold one, and watch some fireworks with your favorite people. :) Even if you're not from the US. Go have summery fun!
Related Posts Plugin for WordPress, Blogger...