nav bar


Tuesday, August 23, 2011

finger knit necklace


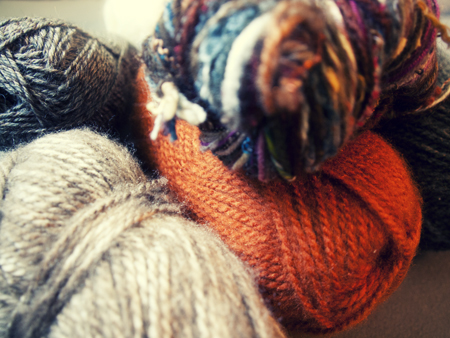
Just a quick little crafty post to get the day started! I pulled out the yarn for a bigger project but I wanted to try something quick and easy that I've been seeing across the webs for a while now. It's a super easy way to make a necklace, some garland, or whatever else you could think to do with it. Make it as long or short as you want! I think it'd also be a good way to put some leftover yarn remnants to use.


I went with this tutorial because it was very easy to understand and I really liked the added button to make it something special. I don't think I could've done a better tute without pretty much copying it so I'll just send you over to Design Seedz and you can check it out yourself!

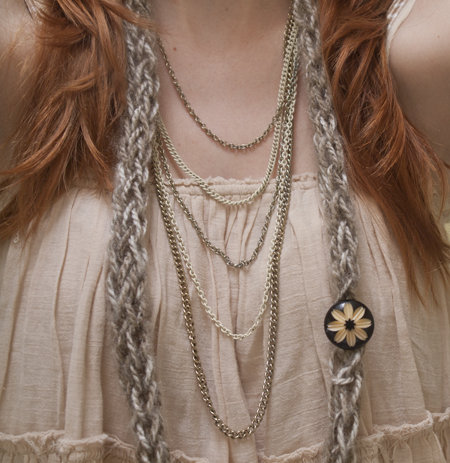
Just find some yarn you have laying around and get those fingers going! I delved into my collection of vintage buttons for this one and found a pretty flower button to add. Go to town!

I think I like wearing it with one of my big chain-y necklaces. There's a nice contrast between the wool and metal chains.


I'm trying really hard to fill this week with posts. I don't want to get busy and end up eating my words but I'm going away for a long weekend up the mountains from Friday to Sunday and then a short beach trip from Monday to Thursday. I start fall classes Thursday night! Eeek! So I really want to get some goodies up before I leave for almost a week.

On the plus side, I finished my online math class as of noon yesterday *major sigh of relief*. On the neg side, my "maybe it'll workout secret plan" I mentioned probably last post totally bombed. All I'd like to say about that is thank you college, from the bottom of my heart. I'm so glad I paid a bajillion dollars to attend you and you can't even do me a small favor now. Way to look out for your own. If I am ever in the position to donate large sums of money to a school, I will not be sending any to your dumb butt. I send you my good riddance from grad school.

Ahem.

Hope everyone's week is starting off beautifully! It feels like fall in Philly today! Loving every second of it. :)

Wednesday, August 17, 2011

stuffed peppers


I feel so much lighter after my last post. I appreciate your kind words of encouragement and am sorry that some of you even share my frustration. I've made some progress in that department but I'm still waiting to hear a few things from a few people so for now, knock on wood and stuff some peppers!

These were as colorful and pretty as they were delicious. Start off by sauteing some onions and garlic in olive oil.


Get your ground beef in there and brown it up.


While that's cooking, start heating up your tomato sauce, basil, and cream in a pot.


Have your peppers all cleaned an ready for stuffing.


Add your already cooked orzo to the meat mixture and about a cup of the cream sauce. Give it a good stir. The original recipe said to add half a cup of sauce to the mix but that didn't seem to be enough when the peppers were cut open so next time I'd add a full cup.

Stuff each pepper with the pasta/meat/sauce mixture and cap it with its top.

Pop them in the oven for 30 minutes. You may want to cover them for the last ten so they don't brown up too much.


Meanwhile, make up some delicious garlic bread to serve along side it. (I'll post the recipe for that later!)


I had some leftover orzo that I mixed with tomato sauce and served it with the peppers and garlic bread.


It was a nice hearty, yet still summery meal after eating mostly hot dogs and hamburgers for dinner as of late.

Enjoy!


Stuffed Peppers
slightly adapted from Just the Tip

6 bell peppers, tops sliced off and cleaned out
2 cups of cooked orzo
1 1/3 lb ground beef
1 small onion, chopped
4 cloves of garlic, minced
2 tsp olive oil
1 jar tomato sauce
1/3 heavy cup cream
1/3 cup fresh chopped basil
grated parmesan

Preheat oven to 400F.

Heat olive oil in a saucepan and saute onions until soft, about five minutes. Add garlic and saute for another minute or two. Add ground beef and cook until browned. While ground beef is cooking, add sauce, cream, and basil to a pot and heat on low.

When everything is cooked and heated through, add two cups of cooked orzo and one cup of the cream sauce to the meat mixture. Stir to combine. Line a deep baking dish with foil and stand your peppers up inside. Spoon the filling into each pepper and top with a spoonful of cream sauce. Grate some fresh parmesan over it and cap with the pepper's top. Add any remaining cream sauce to the bottom of the pan.

Slide them in the oven for 30 minutes. Cover for the last ten minutes to prevent the peppers from getting too brown.

Serve up with your favorite sides and enjoy!

Friday, August 12, 2011

frustration and inspiration

I have no idea where this post is going to go within the next 10+ minutes of writing so bear with me. My head feels like it's full of cotton and I think I need to get this out, even if just for myself, so that I don't feel so creatively constipated anymore. (I'm charming, I know, sorry.) ;)

After having a lunch date with a close friend from high school and discussing the handmade/homemade life, I think the time has come now more than ever to start making the products I've been dreaming of and filling sketchbooks with and create a small business for myself. A petite business at that. I don't have any lofty ambitions right now of fully supporting myself on my own art but I need to do something. I registered Tenpenny Splendid on Etsy months ago, probably around the time I started this blog, but I have yet to list a product. This is due to a laundry list of reasons that I am determined to resolve now.

vintage fabric waiting to be sewn..

One being my busted sewing machine. It's not really broken, it's just in a state of unbalanced tension that I apparently can't fix myself. Believe me, I've tried everything. That's first on the list to get remedied now that I've found some places I can take it to. Another reason was time, which I have more of now that I'm on a set path and about halfway done my Master's.

That's one of my two main frustrations right now. I have time. I just don't know what to do with it. June was crazy with my super compacted summer class but then I was released into the rest of summer and had no idea what to do with myself. Thus the reason that blogging has been so scarce. I've just been so stuck. I have so many ideas but something always stops me from putting them into motion. I want to sew but my sewing machine is apparently going through something personal right now. I want to get back into fabric printing and have all the necessary supplies, but not the facilities. I feel like I just always need one more thing which is why nothing gets started.

sad sewing machine collecting dust..

My second frustration, which pushed me to this new found determination is trying to find a job. I could go on for days about how infuriating this whole process has been but I'll keep it short and just say this.. The fact that everything is online now SUCKS. It's impersonal and impossible. Everyone ignores you, no one feels the need to get back to you, and everyone wants a million years of experience, but no one is willing to give any out. There is no way to stand out and no way to know if your resume has even been looked at. I'm frustrated, fed up, and tired. So tired of searching, and emailing, and writing a brand new bang up cover letter each time just to get NO response whatsoever. /rant

yarn waiting to be crocheted..

To sum it all up, I'm actively seeking ways to start this up now. I'm taking my sewing machine for repairs in the upcoming week and inquiring about local facilities where I can screen print. I need to do something for money and for me and I'm hoping things can just work out for once.

Speaking of printmaking facilities though, if anyone knows about places in the Philadelphia or Bucks County area where you can screen print on your own, any info would be greatly appreciated.

If you've made it this far, thanks for listening to me rant and just get some things out of my head. I needed to. And hopefully some good and crafty things will come from it! :) Have a great weekend!

Tuesday, August 9, 2011

french pressed iced coffee


I pretty much bought a french press for the soul purpose of making iced coffee. I saw this post on The Bitten Word and thought, "I need this immediately!" and went out and bought one the next day. I love me some iced coffee in the summer but I drink it other times during the year too. There's nothing like a steaming hot latte to warm your bones on a cold winter day, but sometimes I want coffee and something refreshing no matter what the temperature is, so I'll opt for an iced coffee instead. Thus, good investment. Not to mention the fact that you can obviously make hot coffee with it too.

I added four cups of water to the press and half a cup of ground coffee. (Adjust to your likings.)

Mix it up!


Watch the grounds swirl..

Get the lid on but don't push the plunger down! Clear some space in the fridge for your new best friend and slide 'em in.

Now leave it alone! After seeing a few iced coffee recipes, it seems like the recommended time is to let it sit from 8 hours to overnight. I did overnight.

In the morning, take out the press and push the plunger down slowly. Add ice to a glass and fill with coffee, milk, and your favorite sweetener. I want to try making flavored coffee sometime too. Yum!


It was amazing. Delish iced coffee for way less than you'd pay if you got it out. I can't tell you how excited I am that I have a french press full of iced coffee sitting in my fridge right now. It makes a decent amount too!

Before I wrap this up, I have a question for those of you who own french presses. On the instructions that came with the press it says to only use coarse ground coffee. When I went to the store I saw coffee labeled fine ground, extra fine ground, and the rest had no specification at all. I gave up after standing in the coffee aisle for an awkwardly long time and just grabbed one with no specific ground cause I assumed that would be "regular". This lead me to look into coffee grinders but the only ones that allow you to choose the ground size are the super expensive ones. So my question is.. is it good enough to just use the regular, not fine ground coffee? Or do I need to put out the money to get a coarse grind? The one I used for this seemed to strain just fine but I don't want to screw up my filter, ya know?

Have a great week!

Thursday, August 4, 2011

late summer table

I think it's no secret by now that the kitchen is my favorite room in the house. I look at home design magazines like most people look at US Weekly. I have already decided that I will be totally sold on a home by its kitchen alone. I can't wait until I can start looking for a place of my own after being in rented apartments and houses during college with tiny, old, (previously dirtied - yuck) kitchens that I couldn't makeover even if I had the money to.

Today I went to the mall and got myself a microplane zester (finally! - have you ever tried getting zest from a cheese grater? Just no.) and pretty stackable bowls since my favorite brownie bowl had a little accident. :( The kitchen has become my playhouse and it's tool and utensils my toys. And I couldn't be more content.

That leads me to today's post. I did a little recon on Anthropologie's website the other day to see if they still carried a super awesome kitchen item that I've been dying to get my hands on. And while I was there, I had to look at all of their other kitchen stuff too. I was totally in love with some of the color schemes they had going on in their dishes and was inspired to make a mix-n-match table setting out of them.

All of the colors remind me of now, late summer. That tiny little season between regular summer and fall. I consider it a season all on its own because there's just something so unique about it. It smells like fall and the beginning of a new school year, yet I still want to lay in the sand and sit outside at night. It's hot like summer and the color palette is too. When I think about a summer color palette I think of aqua, mustard, salmon, and light yet rich colors. When I think about a late summer color palette, there's cherry, cobalt blue, and persimmon.. colors that remind me of a hot sunset, a little deeper and darker.

This is what goes on in my over-analyzing art school-ruined head anyway. :)

Here is my late summer table setting, had I a kitchen or back patio to set it up. ;) It's for the last few barbecues and the nights that start out hot and end with a breeze that begs for a light cardigan.

1 2 3 4 5 6 7 8

Happy almost Friday!


Tuesday, August 2, 2011

water color fun

I can safely say I haven't touched water colors since high school art class. But I think I have just found a new love for them.


See, what happened was, I decided it'd be a great idea for Charlie and I to make anniversary presents for each other this year. We started dating five years ago this past July 7th and I thought we should honor the date by exchanging something special. And since I'm flat broke and he has a tight budget now that he has a new apartment, making something seemed to make sense.


From the beginning I knew I wanted to make a book. I really like bookbinding and have gotten better at it since binding all the books for my senior project (nightmare). The only thing I didn't know was what the book was going to contain. I originally thought of some sort of scrap book of things I've collected over the years but couldn't find a good way to go about it. Then I thought of just photos with text. The thought of full bleed photos with text on top bored me to tears though. Then I had the brilliant idea of combining my first two ideas and taking polaroid photos and then sewing them onto the pages combined with text to give it a more scrapbooky feel.

That was my favorite idea. Until I looked up the price of polaroid film. *facepalm*


When I figured out I could just get him a nice gift for the couple hundred dollars the film would've cost, I realized it was time for a new plan. I decided to illustrate the book. This doesn't seem like a problem unless you know how I feel about drawing. I actually do love it, I'm just no good at it. And I totally admire people that are good at it. I'm actually going to save that for another post though because I have too many opinions and complaints for this already growing post. But I'll try to keep it witty and lighthearted, I promise. ;)


So, as I will explain in my I Hate Drawing post, I have big issues with letting loose when it comes to drawing, and not being a totally anal retentive perfectionist. I think I'm getting better at letting go though, and the water colors helped. I've always liked painting because it's not so precise. Unless you're one of those people who makes paintings that look like photos. Which I am not. So I just told myself I'd do a simple sketch of the illustration I wanted and then have fun painting it up.


So far it's coming out pretty much the way I wanted it to. It's very relaxing and mistakes are easily fixed with a few more brushstrokes. It's nothing museum-worthy, but it's exactly what I wanted. Fun, pretty, and easy. We're obviously a little late on exchanging the gifts but I'd rather take the time to do it right than worry about deadlines. It'll kind of be like having a second celebration anyway! :)


So what have you made for special people in your lives? I need more ideas because I do love making things for people. Any inspiration is greatly welcome. :)

Have a great week!
Related Posts Plugin for WordPress, Blogger...