nav bar


Showing posts with label eat. Show all posts

Monday, January 28, 2013

chocolate covered pomegranate seeds


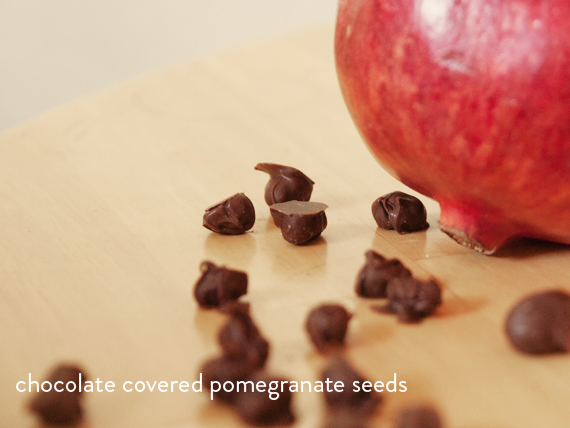
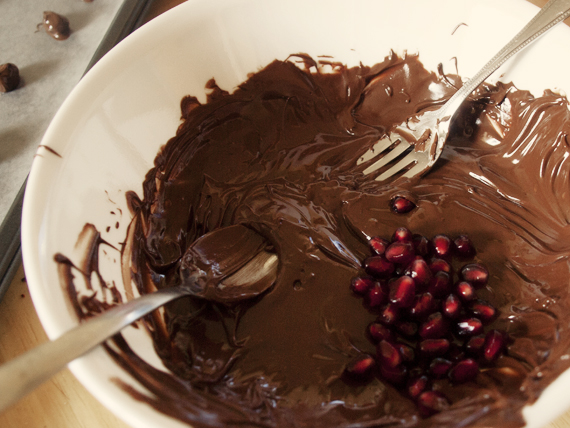
Last year, sometime around February or March -ya know, right after pomegranate season- I decided it was absolutely necessary that I make chocolate covered pomegranate seeds. Of course by that point I couldn't find one in a store to save my life. I cried on the inside and filed the idea away for the next season.


I decided I was going to be very obsessive methodical about the process, and that each seed needed to be individually coated with chocolate. This would ensure a proper fruit to chocolate ratio, which is essential. To achieve this, I melted down my favorite chocolate - Hershey's obviously - tossed in a handful of seeds, and went for it.


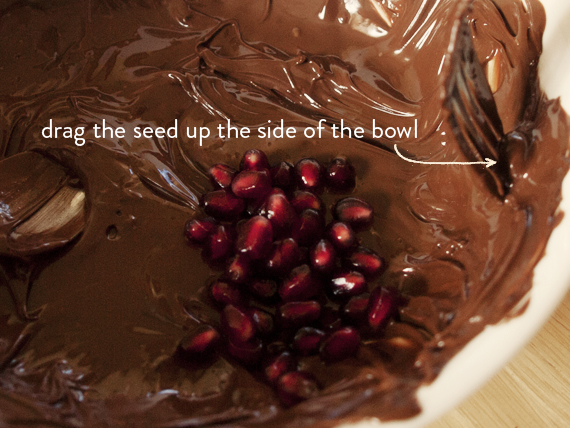
I found that the best way to go about it was to pull over a seed with a fork, coating it in chocolate, and then drag it up the side of the bowl. The excess chocolate drips through the fork so you can just drop it onto a wax paper lined baking sheet.


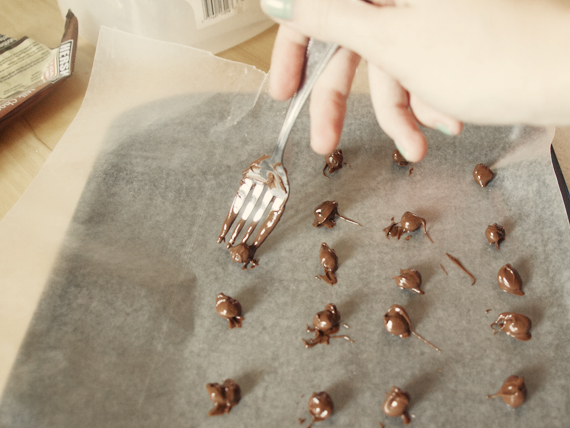
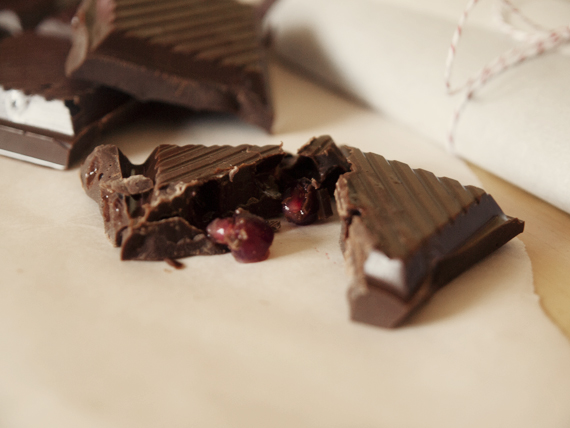
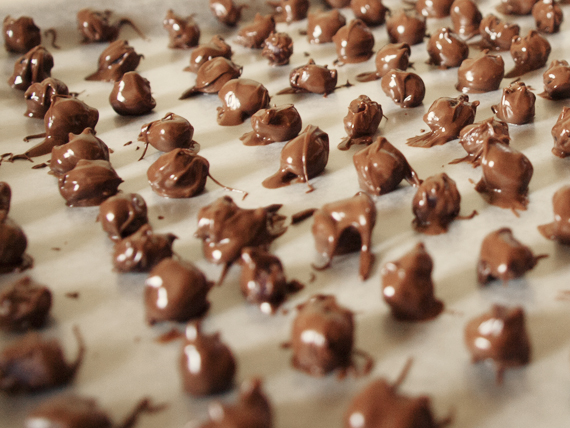
Now. As you can imagine, this was an immensely tedious process. Worth it? Absolutely. The cold chocolate shell with a pop of pom juice inside.. I die. However I got about halfway through the seeds when my attention span crapped out. But not before I got tons of sweet loot..


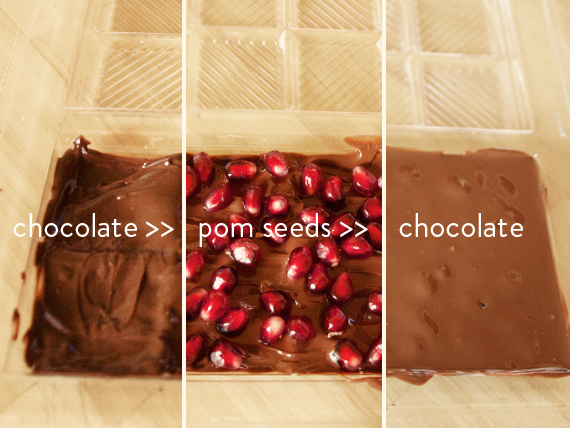
After that, I pulled out the chocolate bar molds I bought over the summer with every intention of making my own chocolate bar concoctions. I figured pomegranate chocolate bars would be a good way to start.


I still have one and a half of those sitting in the freezer right now. The individual ones were gone in a day. I kid you not. And there was an entire baking sheet full. You have been warned.


Not that this really needs a recipe, but here it is all in one place.

Chocolate Covered Pomegranate Seeds
1 pomegranate, deseeded
12 ounces (give or take) of your favorite chocolate

Deseed the pomegranate. See this post for a pretty easy method. Pour the chocolate chips or chunks into a bowl and microwave, checking and stirring every 10 seconds or so. Pour in a handful of pomegranate seeds. Using a fork, drag them up the side of the bowl, one at a time. Place each covered seed on a wax paper lined baking sheet. Refrigerate until chocolate is set.

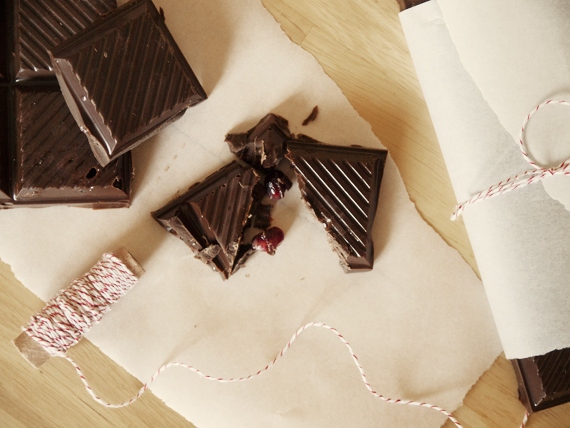
For the bars, coat the bottom of a mold in melted chocolate. Sprinkle a layer of pomegranate seeds and then finish filling the mold with more chocolate. Refrigerate until chocolate is set. Wrap it up all cutesy in torn parchment and baker's twine and give it to someone! Maybe for Valentine's Day. I'd be pretty stoked to get that. Just sayin.


Now seriously, go brave the cold and get yourself some pomegranates before they're all gone!


post signature


Tuesday, January 15, 2013

chicken lettuce wraps


Over the holidays, Charlie and I had lunch with his parents at P.F. Chang's. This was the first time I had ever been there and I absolutely fell in love with the chicken lettuce wraps. This must be a shared sentiment for a lot of folks on the internet, because finding a good copycat recipe was not hard.

It makes for a nice light lunch, which is how we had it yesterday. Besides a bit of brown sugar, it's got all good stuff in it too. I might even try to cut the sugar a little next time (and there will be a next time) because I'm more of a savory/salty kinda gal anyway. I chose to steam the chicken to make it even lighter, instead of cooking it in oil like the recipe suggested.


I know it's a tired old resolution, but we're trying to eat better and be more active in 2013 and beyond. My clothes have definitely gotten a bit snug over this past year and my energy is in the crapper. I'm anemic and awful at taking my iron supplements but I think it's more than just that. I think the food I've been putting in my body plus my lack of exercise have rendered me sluggish. But I've been getting better at taking my iron and my lady vitamins with calcium and whatnot, and I'm dusting off the ol' juicer. It's time to make some better choices. I'm also going to get back into my yoga dvds in between the Zumba class I hope to start taking!

Long story short, you should make these because they are freakin amazing. And with just Charlie and I eating these for lunch, there was a ton leftover for later lunches. Can't get much better in my book. ;)

Hope you're 2013 is starting off well!


P.F. Chang's Chicken Lettuce Wraps
Adapted from Lali on food.com 

2 boneless skinless chicken breasts 
8oz diced water chestnuts 
2/3 cup diced mushrooms
3 tbsp chopped onions
1 tsp minced garlic
4-5 leaves iceberg lettuce
pack of rice noodles (or halve it if you don't want a lot leftover) 

Stir Fry Sauce
2 tbsp soy sauce
2 tbsp brown sugar
1/2 tsp rice wine vinegar

Special Sauce
1/4 cup sugar
1/2 cup water
2 tbsp soy sauce
2 tbsp rice wine vinegar
2 tbsp ketchup
1 tbsp lemon juice
1/8 tsp sesame oil
*1 tbsp hot mustard
*2 tsp water
*1-2 tsp garlic and red chile paste

*Mix these items together and add to the sauce for some heat, if you're into that sort of thing. I left them out. :)    


Mix up the special sauce first. Dissolve the brown sugar in the water (it helps if you heat the water) and then add soy sauce, ketchup, rice wine vinegar, lemon juice, and sesame oil. If you want some heat, mix the hot mustard, the water, garlic, and red chile paste together. Set both aside in the fridge and add desired amount of heat to the sauce when ready to serve.

Mix the soy sauce, brown sugar, and rice wine vinegar to make the stir fry sauce. Cook your chicken however you like. I steamed it to keep it a little lighter. Set the chicken aside to cool. Dice up the water chestnuts, mushrooms, and onions. Shred the chicken into small pieces when it's cool enough to handle. Add vegetables, chicken, and garlic to a pan with a little oil or non stick spray. Pour in the stir fry sauce and saute until everything is heated and the mushrooms and onions are soft. Add rice noodles to a pot of boiling water and cook for three minutes. Strain and rinse in cold water to reduce clumping. I also tossed them with a tiny bit of olive oil to keep them from sticking together. 

Serve it up! Top a lettuce leaf with rice noodles, stir fry, special sauce, and fold it up. Nom.


post signature

Wednesday, October 31, 2012

pumpkin spice donuts


Ever since I was little, whenever a big storm was supposed to hit, be it rain or snow, my mom would run to the market to make sure we had enough sugar, flour, and butter while everyone else was stocking up on bread and milk. Baking was our thing during times when the weather was too bad to go outside. To keep the tradition alive, I decided to break in my new donut pans as we waited out Sandy. 


Getting back into blogging has been a little challenging. I had to track down all of my photo gear - none of which I immediately knew the location of. After I located my camera, my tripod, the little attachment piece for the tripod (which I didn't realize was still on the bottom of the camera for about ten minutes), and the battery charger, I got everything all set up to start baking and shooting. And then I turned the camera on only to have it inform me that there was no card. Still have no idea where that ended up. It's nowhere near my card reader so I'm out. So I had to shoot with my little point and shoot. Which is totally good 'nuff, I just got used to all the lovely raw editing options that make night kitchen photos look less crappola. *shrug* I tried. 


This recipe came together really quickly. Even the glazing and sprinkling took no time. I used both regular sized and mini donut pans. I got ten regular sized donuts and twelve minis out of it. A certain boyfriend kept sampling the minis before I even melted the chocolate so I can safely say that these are delicious with or without topping. ;)


I think I'm going to make these for the lunchroom at work one day soon. I think they'd be really well received. :)

Now that I have off a third day for all of this Sandy havoc, maybe I'll try another fall flavor variety later today. Apple cider, perhaps. 


Since these are something you absolutely need in your life, like, now.. check out the recipe after the jump!

Happy happy Halloween!

Tuesday, June 5, 2012

raspberry dark chocolate scones


I bought two containers of raspberries the other day for the raspberry syrup I made for iced coffee. I ate a bunch by themselves but wanted to use the rest up before they had a chance to go bad. And what better way to use them than to bake them into something! Scones, to be exact. I saw a recipe for these scones as I was browsing through foodgawker and knew I had to try them, especially since I had all the ingredients on hand.


They were pretty amazing. I've never baked with raspberries before and the flavor came through brilliantly. The bitter dark chocolate was the perfect addition to all the sweet. The only thing I noticed since I've made two different scone recipes before this one, was that the dough was extremely sticky compared to other ones. I'm not sure if it was just different ratios of wet to dry ingredients or because the berries add extra moisture, but it was a little harder to work with.


I still wanted to post the recipe though because they were absolutely delicious. So if patting the dough into a disc, cutting it into pieces, and moving those pieces onto a baking sheet isn't going smoothly, you may have to shape the pieces individually once they get there. That's what I did anyway, to make them look pretty.


I definitely recommend whipping these up for breakfast one day if you have extra raspberries and chocolate laying around. I might experiment with adding these two mix-ins into the other scone doughs I've tried to see if it's easier to work with but still tastes just as good. If not, sticky dough it is! :) I'll let you know what I come up with.


Have a great week! Is anyone else secretly enjoying this sudden cool weather? I know it's going to get crazy hot soon so I'm basking in the cool breeze while I can. :)

See link below for recipe!


Friday, June 1, 2012

summer flavor shots


Last summer I finally mastered a method of making delicious iced coffee at home. Which really helps the ol' change purse. The next thing to do was figure out a sweetener that would work best with a cold drink. I've been using raw sugar in my coffee lately because artificial sweeteners are always questionable. And the ones that are supposedly healthy taste awful in my opinion. (I'm lookin at you Stevia and Truvia.) And raw is always better than processed so raw sugar it is! Of course I use it in moderation and really only in my coffee so I'm not worried about it effecting my weight. And it hasn't, for the record. :)


So! The next logical step was to create simple syrup for my iced coffee. That way there's no grainy business at the bottom of the glass from undissolved sugar. Simple syrup is really, very simple. It goes like this..

Combine equal parts sugar and water in a small pot.
Boil until dissolved.
Simmer for 10-15 minutes.

Bam. Liquid sugar.


And as I'm sure you've seen around the webs, people have found ways of making other syrups in different flavors, often to imitate popular delicious drinks from certain coffee shops. ;) Well I went and bought myself four of these olive oil bottles from target and decided I'd try four new flavors for each season. I made a list and decided to get to making the summer ones since it's absolutely iced coffee season. First up on the list - coconut, raspberry, vanilla, and a plain simple syrup for unflavored coffee.


This seriously took me about an hour one morning. I just kept cooking the sugar, adding the flavors, bottling, rinsing the pot, and repeat. Such a quick little project for so much tasty coffee. I can't wait until I get to the fall and winter flavors this year! This is gonna be good.

I'm sipping on some coconut iced coffee as I type this. I just need a little sand and some waves and I'll be all set. :)


What's your favorite summertime flavor? Hope you have a great weekend!

Check the recipes below!


Friday, April 13, 2012

cinnamon sugar pull apart bread


This baby has been on my to do list since I first saw it some time last year. I'm not even sure where I saw it first because once it got out, everyone was making it. And for good reason. Savory versions with cheeses and herbs too! That's next on my list. I had the recipe from Joy the Baker bookmarked so that's the one I went with.


I had the house to myself yesterday so I got all domestic, kneading dough in between loads of laundry. ;) Once the dough comes together and rises to double it size, you knead in a bit more flour, let it rest, and get your beautiful cinnamon sugar filling together.


Roll out the dough, brush on the melted butter, and top with the cinnamon sugar mix until your dough looks like warm sand on a beach. :)

Like Joy says in the recipe.. it's going to look like way too much sugar. But go for it. Trust me, I almost backed down but after it bakes up and some of the sugar runs down to the bottom, you'll be glad you packed it all in there! Also, some of it spills off as you're cutting and stacking dough so you'll be glad you have back-up.


After your dough is rolled and sugared, cut it into six long strips and stack 'em, one on top of the other.


Cut the strips into six small stacks. Then grab your bread pan and pile the stacks in, one in front of the other. You may have to push them back to fit them all in but it'll all spread out nicely as they rise and bake.


I love how the slices twist and turn to fit as they bake. :)


It's best eaten warm so if you manage to have some leftover the next day, heat it for a few seconds and it's good as new. I had to go to class right after I pulled it out of the oven so I wanted to take some shots the next morning of the finished product but I definitely had to taste it right away. I took the one above last night and then more than half of it disappeared! Well, not exactly disappeared, but was "sampled" by a few people who sang it's praises.

Anyway, this morning before Charlie left for work, we heated up a few slices and had it with coffee. It was a wonderful way to start the day. :)


 So good. I whole-heartedly recommend trying it! Hope you have a great weekend!

Check out the recipe below!

Monday, March 19, 2012

chai spiced apple crumble


I think one of the top complaints (or maybe the only complaint) about having fresh produce is not being able to eat it quick enough and having it go bad. I always want to buy tons at a time so I can have a variety to pick at, cook with, and mix into whatever, but that's a perfect way to have more than you can eat in the small window of freshness.


One thing I never thought of until the produce was too far gone was to quickly whip something up that will extend not only the freshness, but the deliciousness as well. I mean, a mushy berry is edible, but who wants that? I've been finding everything from baking the fruit and making jams, to freezing it into cubes to add to drinks and smoothies later.


So today I did what I've been wanting to do and salvaged two granny smith apples who had seen better days. You know the deal.. soft spots, a little bruising on the peel. Not something I want to bite into, but a little peeling, a little chopping, and you've got yourself the base for a delicious little crumble. A chai spiced crumble to be exact! Now, you can make this with fresh-off-the-tree apples for sure, I just thought I'd try this recipe as a way to bake up my existing apples that needed a little love.


This recipe calls for five apples and since I only had two, I just halved all the spices and other ingredients. I know, that's not exactly half the apples but it was delicious so good 'nuff in my book! That's some fancy baking math for ya.


I can't wait to take full advantage of the recipes I've collected and not waste a drop of fruit or veg this summer. And besides just saving my last two apples, this recipe was absolutely amazing. The chai flavor is spot on. It's like sipping a latte only you're spooning it into your mouth with baked apples. So good. The crumble is crisp and the apples are warm and tender. It would definitely be a winner over ice cream, especially with this warm weather! But I just devoured it out of a bowl and it was amazing just like that.
 

Friday, March 9, 2012

homemade ice cream: chocolate swirl


I've been an ice cream fiend for as long as I can remember. Summer or winter, it doesn't make a difference. Ice cream is delicious anytime, anywhere. I've been dying to get the ice cream maker attachment for the KitchenAid mixer ever since I found out there was one. And it wasn't just the price tag that has kept me from getting one. You need to be able to dedicate a decent amount of space in your freezer to keep the bowl chilled, and space is one thing I really don't have at the moment. 

One lovely, amazing day, I came across a recipe for homemade ice cream that did not require any sort of ice cream maker! I bookmarked that one and a little while later, found another! The recipes have slightly different ingredients so I want to try both and see what the difference is. I started off with one from The Wannabe Country Girl, whose recipes never disappoint. And surprise, surprise.. neither did this one. 

 
I wanted to start with something fairly simple so I just used the base recipe and added chocolate syrup to make a chocolate swirl ice cream. 

Making it is super simple and it takes almost no time at all. The longest amount of time is waiting for it to set in the freezer. Thankfully, yesterday was such a beautiful day I got to escape the house and by the time I came back, the ice cream was ready and waiting. :)


Just be careful that you don't over mix! You want the cream to just hold its shape. You're not looking for stiff peaks like you do with whipped cream.


For the chocolate swirl, I just swirled some syrup around the sides of the container, poured about an inch or so of cream mixture, swirled a little syrup on top, and then kept alternating those layers. You can mix in anything you want to the basic recipe (cream + confectioner's sugar). Go crazy! I fully intend to get my mixology on and experiment with as many flavors as I can think of. I already have two in mind for next time!


I got quart + a pint of ice cream out of this. Won ton containers are pretty awesome (and free) for things like this. :)


Grab a spoon, dig in, and enjoy!

What's your favorite ice cream flavor? I could always use more to add to my list of things to try!
post signature

Tuesday, February 21, 2012

a birthday cake fit for a dad


So I ended up going with the very first cake on the list.. the milk chocolate malt ball cake from Krissy's Creations. Thanks for all your input! I really liked hearing what you thought. :)

I'm still dying to try the marshmallow layer one though. Another cake for another occasion!

This cake was a huge hit, and most importantly, my dad loved it.


The icing was like something I've never tasted before.. I guess it was kind of reminiscent of the chocolatey shell of a Whopper. It was smooth and thick but buttery and melt in your mouth delicious! Far from the fluffy whipped buttercreams I'm used to.

The only thing I think I would change to the cake itself is to possibly eliminate the nutmeg, or at least reduce it. I thought it overpowered the malt flavor a little but it was still delicious all the same. Something to experiment with later. :)


I adorned the top of the cake with almost an entire box of chopped Whoppers. Yum. Made it a little challenging to cut but it was all the more delicious to eat! :)


Hope you're having a great week!
post signature
Related Posts Plugin for WordPress, Blogger...